How to Build a Futuristic 3D Website with AI
Create a premium cinematic website using AI-generated robot visuals, Google Flow animation, Gemini 3.5 Flash, Google AI Studio, Antigravity, a scroll-controlled frame sequence, and production-ready hosting.
Quick Answer
To build a futuristic 3D website with AI, begin with a precise visual concept and page structure. Generate a consistent CGI character in Google Flow, animate it into a short controlled motion clip, and use Google AI Studio to generate the first website. Export the code to GitHub, extract the animation into ordered frames, place those frames inside the project, and use Gemini 3.5 Flash in Google Antigravity to connect them to scroll progress. Finish by optimizing asset loading, adding a static and reduced-motion fallback, testing responsiveness and accessibility, then deploying the production build to Hostinger.
The phrase “3D website” covers several different technologies. Some sites load an actual 3D model and render it in real time with WebGL or WebGPU. Others create the impression of depth using pre-rendered CGI, video, image sequences, parallax, lighting, and carefully synchronized motion.
The reference video uses the second approach. Its robot is not a freely rotatable model inside the browser. Google Flow generates cinematic robot imagery and motion, the video is extracted into individual frames, and the site displays those frames in sequence. The result looks three-dimensional while the camera path remains art-directed and predictable.
That distinction matters. A frame sequence gives a designer precise control over the final composition, but it can become heavy if hundreds of large files load at once. A true Three.js scene supports interactive cameras and objects, but it introduces model optimization, lighting, shader, device, and rendering complexity. This guide explains the demonstrated technique first and shows where real-time 3D belongs.
Set the right expectations
What Makes This Website Look Futuristic and 3D?
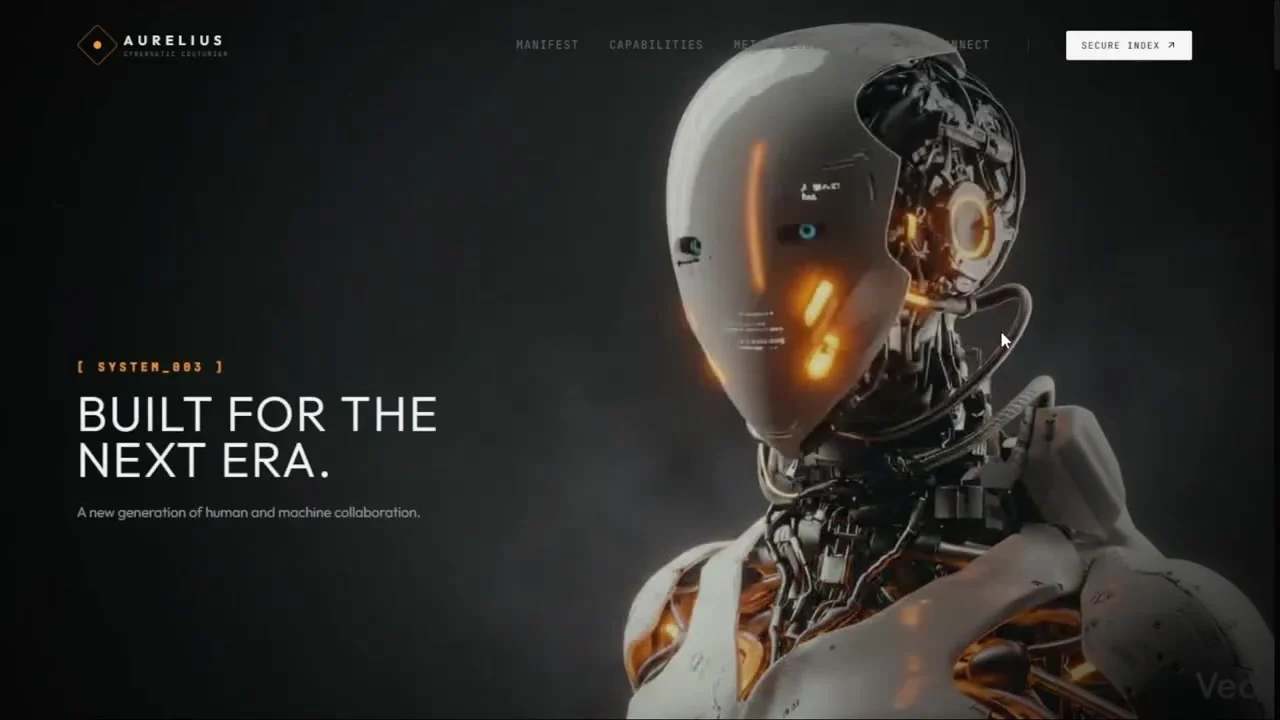
The visual quality does not come from one model prompt. It comes from the coordination of art direction, animation, layout, typography, pacing, and code. The robot image establishes a premium CGI focal point. A dark background creates contrast. Orange lights define the robot’s internal structure. Thin technical labels and spacious typography suggest an advanced engineering brand. Scroll-linked motion makes the scene feel physically present.
The five layers of the effect
- Visual concept: A consistent cybernetic character, color palette, and material language.
- Controlled motion: A short camera or character movement with minimal visual mutation.
- Frame extraction: The motion clip is separated into ordered still images.
- Scroll synchronization: JavaScript maps page progress to a specific frame.
- Editorial interface: Real HTML copy, navigation, details, and calls to action sit above or around the animated visual.
Understand the pipeline
Tools Used to Build the Futuristic Website
| Tool | Role in the Workflow | What to Watch |
|---|---|---|
| Planning document | Defines the concept, page structure, animation, AI coding, and final review sequence | A tool cannot repair an unclear brief |
| Pinterest or design references | Helps establish robot styling, materials, composition, typography, and mood | Use references for direction, not copying |
| Google Flow | Generates and refines the CGI robot image, then creates a short motion clip | Keep the character and camera consistent between outputs |
| Google AI Studio Build mode | Generates the initial React-based website and live preview from a detailed prompt | Review content, code, dependencies, and responsive behavior |
| GitHub | Transfers the generated project into a normal version-controlled workflow | Commit a clean baseline before major local changes |
| SmartConvertSuite | Extracts ordered JPG frames from the generated motion clip | Frame count, dimensions, compression, and naming affect performance |
| Google Antigravity with Gemini 3.5 Flash | Connects the frame assets to the site, edits multiple files, runs the project, and verifies changes | Review commands, generated code, and agent claims |
| Hostinger | Hosts the production build and custom domain | Choose static hosting or VPS based on the final runtime |
Google announced Gemini 3.5 Flash on May 19, 2026 as a model designed for sustained agentic and coding work. The model selector shown in the video uses Gemini 3.5 Flash (Medium) inside Antigravity. Models and interface labels change, so use the current equivalent when following this guide later.
Reference walkthrough
Watch the Futuristic AI Website Build
Watch the six-minute reference once to understand the complete flow. The written guide then slows down each production decision and adds the engineering details needed for a reliable public website.
Plan the Production Hosting Early
AI Studio and Antigravity create and test the project. Your public website still needs a domain, SSL, production files, caching, and a hosting environment matched to its runtime.
Prepare before prompting
What You Need Before Building
Preparation Checklist
- A clear audience, business goal, and primary conversion action.
- A one-page content outline with real headings and supporting copy.
- A defined visual system: dark or light, accent colors, typography, materials, and motion style.
- Reference imagery you have permission to use for inspiration.
- Access to Google Flow, Google AI Studio, GitHub, and Google Antigravity.
- Enough local storage for the project and extracted animation frames.
- Git installed or a reliable project backup.
- A target hosting plan and domain.
Decide what the visitor should be able to do
A futuristic site can still fail as a website. Decide whether the visitor should request access, book a demonstration, buy a product, inspect a portfolio, or read a technical story. The visual effect should support that action rather than delay it.
Define a performance budget
Set limits before generating assets. Decide the maximum initial transfer, approximate total frame weight, mobile fallback, and acceptable loading behavior. Without a budget, an AI agent may preload every frame because that is the simplest implementation, even when it creates a poor first visit.
Complete workflow
How to Build a Futuristic 3D Website with AI Step by Step
Step 1: Write the Creative and Technical Plan
The reference video starts with a plan, not a code prompt. Its sequence includes product inspiration, AI photo creation, first animation, the Gemini website build, Antigravity refinement, and design inspiration. This prevents the workflow from drifting between unrelated tools.
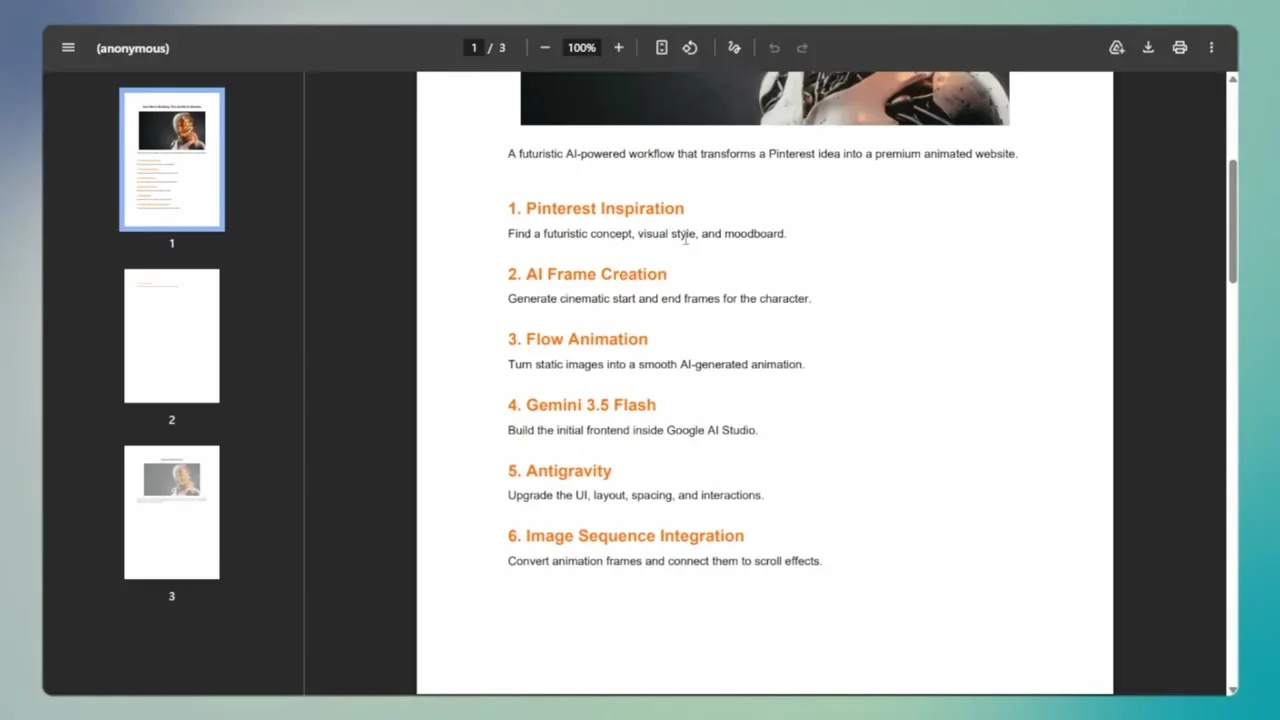
Your plan should specify:
- The brand or fictional project.
- The visitor and the action they should take.
- The hero composition and focal character.
- The sections below the hero.
- The motion source and scroll behavior.
- The initial coding tool and local refinement tool.
- The production acceptance criteria.
Step 2: Collect Visual References Without Copying
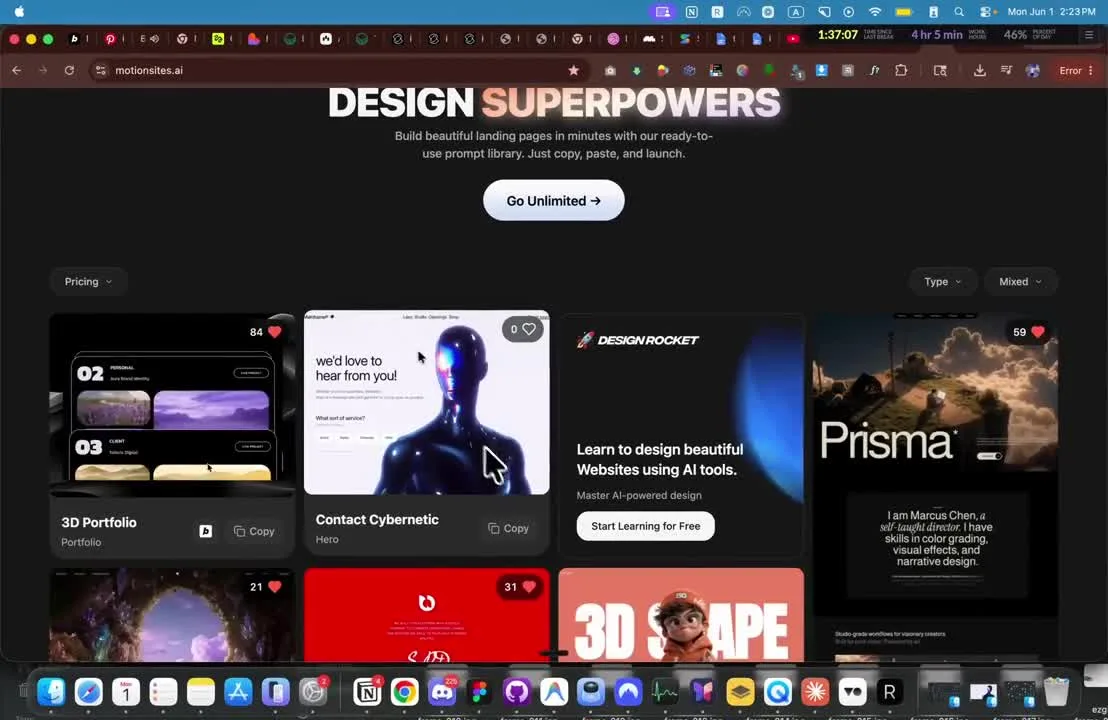
The creator searches for cyberpunk robot concept art to define the visual language. Reference research is useful for identifying patterns such as side lighting, transparent shells, exposed mechanisms, dark backgrounds, and selective emissive color.
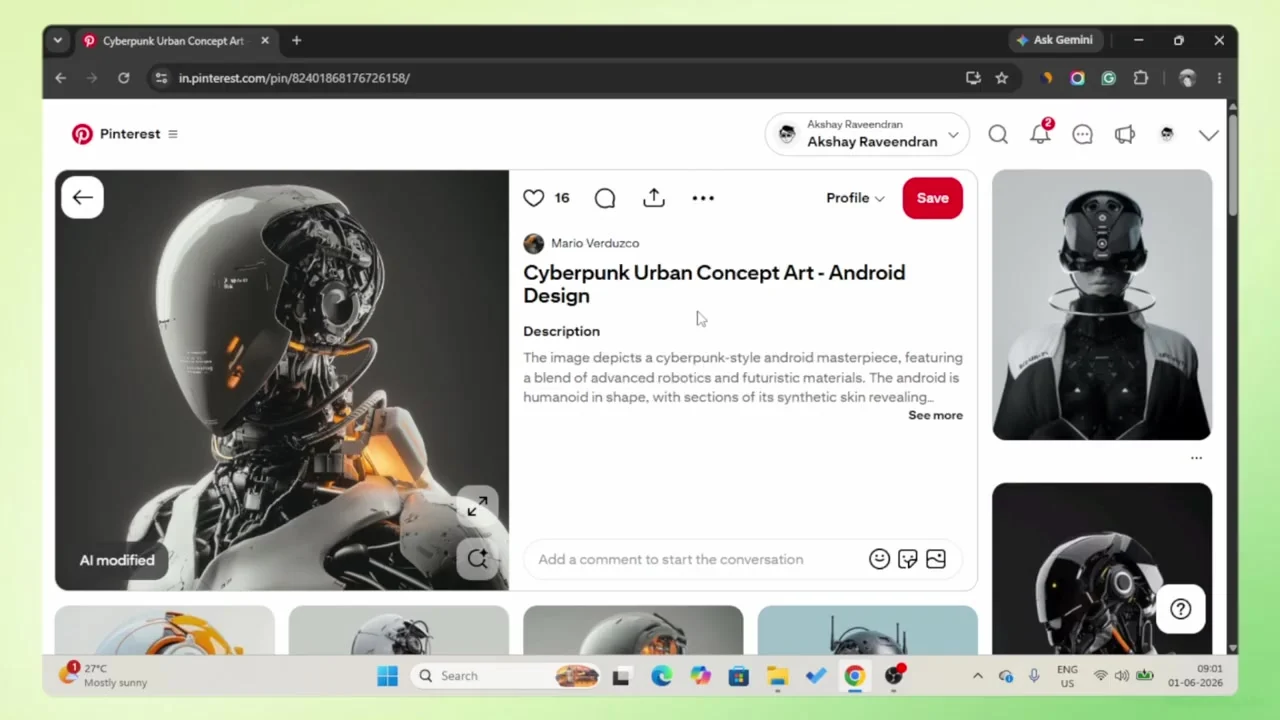
Build a small reference board and annotate what you like: camera angle, negative space, shell material, glow color, type scale, navigation density, and motion pace. Avoid asking an image model to reproduce a living artist’s work or a protected character exactly.
Step 3: Generate the CGI Hero Image in Google Flow
The video uses Google Flow’s image mode with Nano Banana 2. The prompt places the android on the right side of a 16:9 frame, leaving negative space on the left for website copy. This is excellent art direction because it designs for the eventual interface instead of producing a centered poster that becomes hard to use.
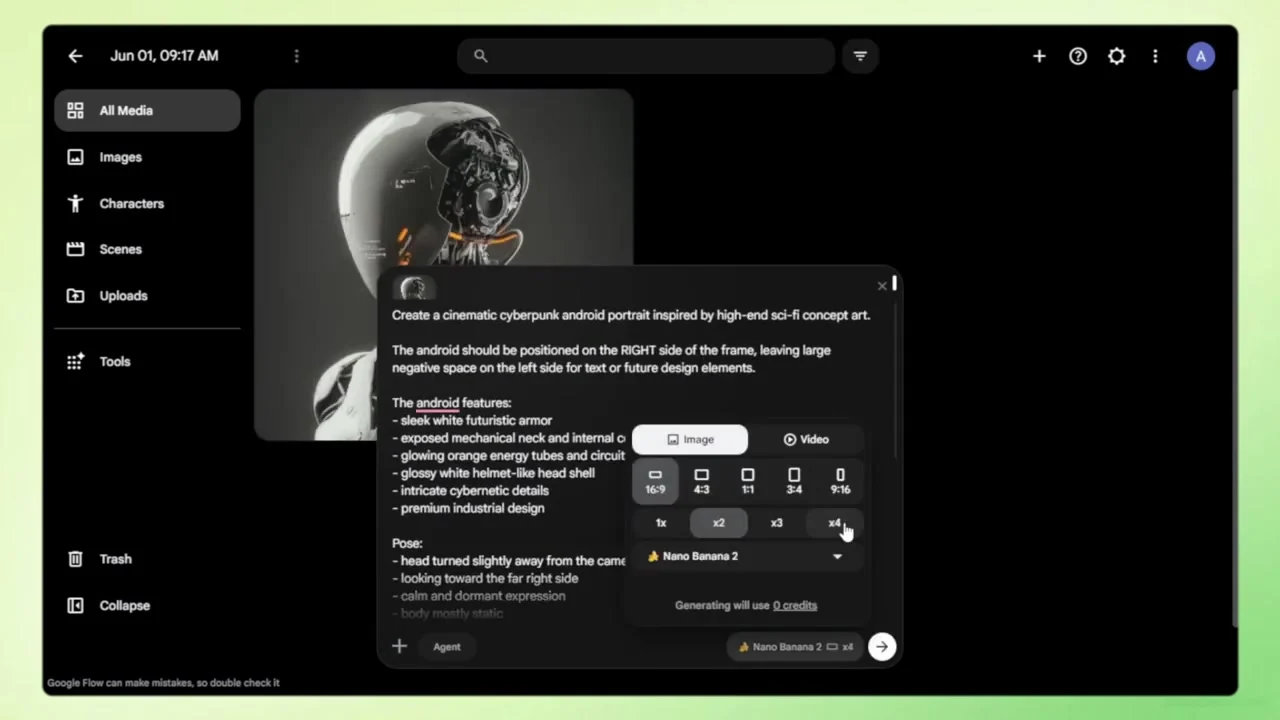
CGI hero prompt template
Create a cinematic futuristic android portrait for a premium technology website.

Composition:
- 16:9 landscape frame.
- Place the android on the RIGHT 40% of the image.
- Leave clean dark negative space on the LEFT for a headline and CTA.
- Show the upper torso and head at a three-quarter angle.

Character:
- Original sleek white ceramic shell.
- Partially transparent cranial panel with visible mechanical structure.
- Fine black carbon components and precision metal joints.
- Restrained amber-orange internal energy tubes.
- Calm, intelligent expression; no weaponry or aggressive pose.

Lighting and environment:
- Dark charcoal studio background with subtle atmospheric haze.
- Soft rim light separating the silhouette from the background.
- Warm orange practical glow balanced by neutral cool fill.
- Premium automotive advertising quality, sharp material detail.

Avoid:
- Text, logos, watermarks, extra limbs, distorted face geometry,
  cluttered background, overexposed glow, or recognizable franchise design.
Generate several candidates and evaluate silhouette, anatomy, label-free surfaces, clean negative space, and lighting consistency. Upscaling cannot fix a structurally poor image.
Step 4: Animate the Character with Controlled Motion
After selecting the key image, the video switches Google Flow to video mode and uses Veo 3.1 Fast. The strongest motion for a frame-sequence website is subtle: a slow head turn, small camera drift, controlled internal glow, or mechanical activation. Large transformations produce unstable frames and visual flicker when scrubbed backward.
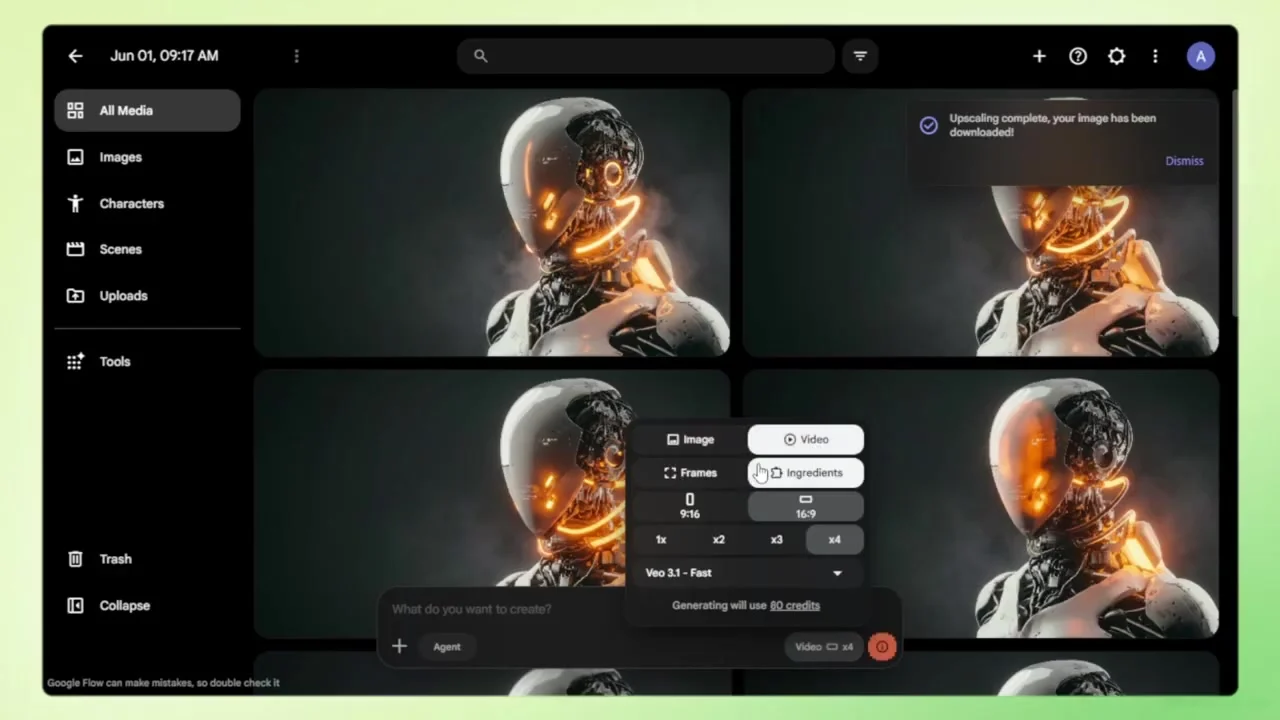
Motion prompt template
Animate this exact android while preserving its face, shell, proportions,
camera framing, background, and material design.

Motion:
- The head turns slowly by approximately 15 degrees toward camera.
- Internal amber energy rings brighten gradually.
- Very subtle camera push-in and atmospheric movement.
- Torso remains stable; no speaking or exaggerated facial movement.
- Smooth continuous motion suitable for reversing and scroll scrubbing.

Do not add objects, change the armor, alter the background,
cut to another shot, or introduce rapid camera movement.
Download the highest practical resolution that preserves detail, but remember that the final web frames will be resized and compressed. More source resolution gives you room to crop; it does not mean every visitor should download 4K frames.
Step 5: Generate the First Website in Google AI Studio
Open Google AI Studio Build mode and describe the complete website. Google’s current documentation says Build mode can generate a full web application with a React frontend by default and a Node.js server-side runtime. It also provides a live preview and code view.
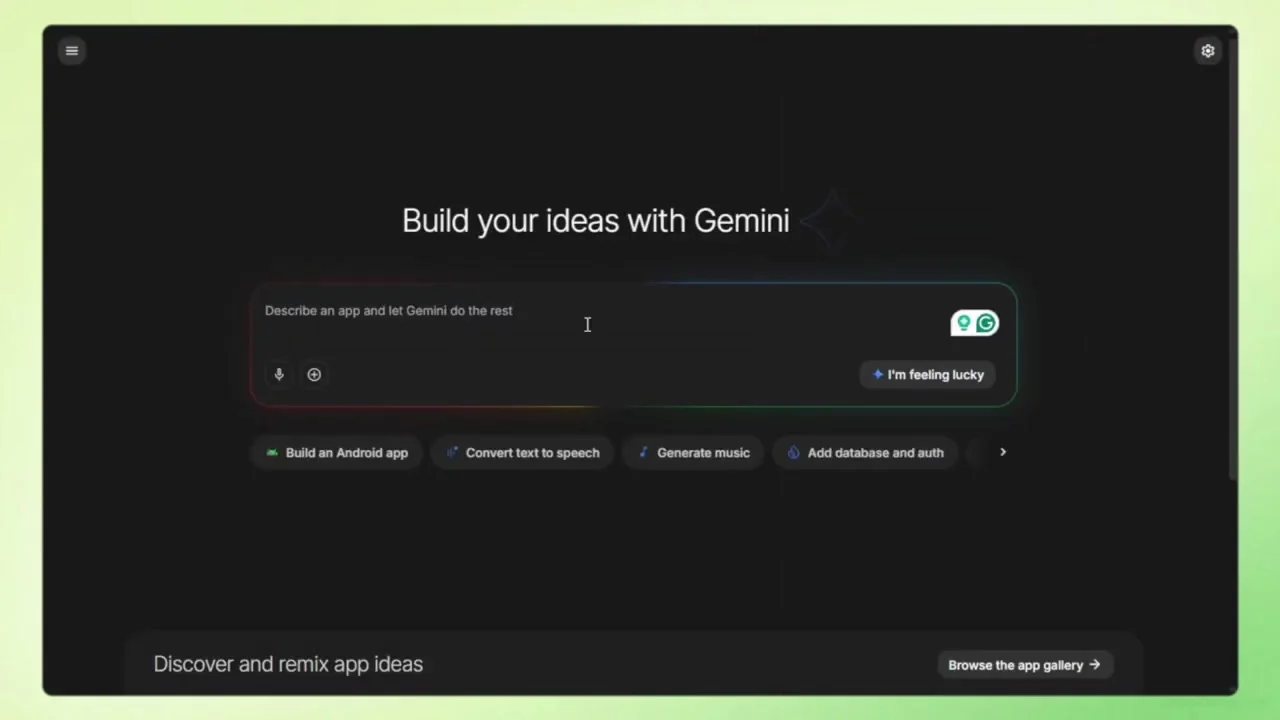
At this stage, generate the page structure and visual system before adding the frame sequence. Ask for a dark industrial brand, semantic sections, responsive navigation, strong typography, cards used sparingly, and a static hero image placeholder. Keeping the first pass simpler makes layout problems easier to identify.
For a deeper explanation of AI Studio’s code, GitHub, secret, and deployment workflow, read how to build a website with Google AI Studio.
Step 6: Review the Generated Design as a Real Website
The reference preview includes capability panels, technical copy, request-access areas, and a restrained dark interface. Review it for hierarchy and usability, not only aesthetic similarity.
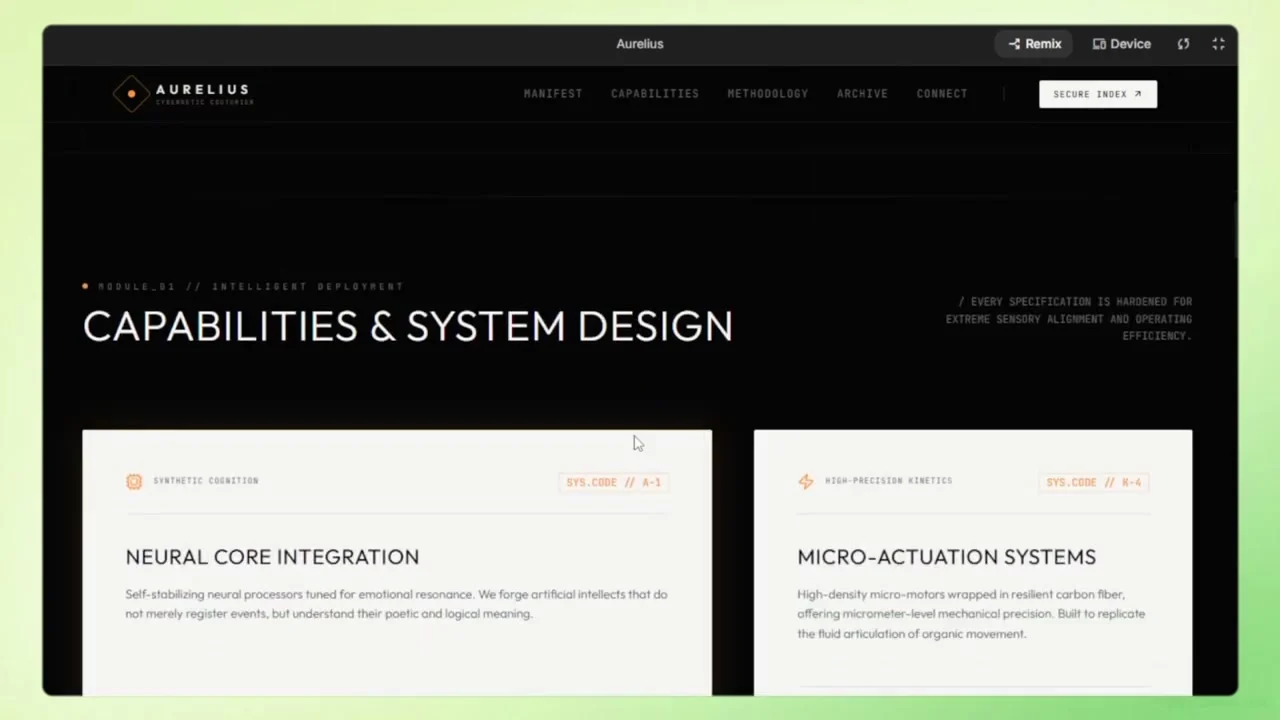
First-pass review checklist
- Does the H1 communicate a meaningful offer rather than generic futuristic language?
- Is the primary CTA visible and specific?
- Does each section add new information?
- Are paragraphs readable against the dark background?
- Do headings wrap cleanly on mobile?
- Are buttons, links, and form labels semantically correct?
- Is invented technical copy clearly replaced before launch?
Step 7: Export the Project to GitHub
Use AI Studio’s GitHub integration to create or update a repository. This moves the project from a hosted prototype into a normal development workflow. Google’s documentation notes that AI Studio can export to GitHub, but it does not currently pull remote changes back into AI Studio, so treat the repository and local workspace as the next source of truth.
Clone the repository locally and create a clean commit before changing the animation architecture:
git clone YOUR_REPOSITORY_URL
cd YOUR_PROJECT
npm install
npm run dev
Do not commit API keys or production secrets. If the generated application uses Gemini at runtime, keep the key in the server-side environment as Google recommends.
Step 8: Extract the Animation into Ordered Webp Frames
The video uploads the short robot clip to SmartConvertSuite’s Video to WebP tool and downloads the resulting frames as a ZIP archive. Each WebP represents a point in the motion. These images become the source material for the scroll-controlled hero.
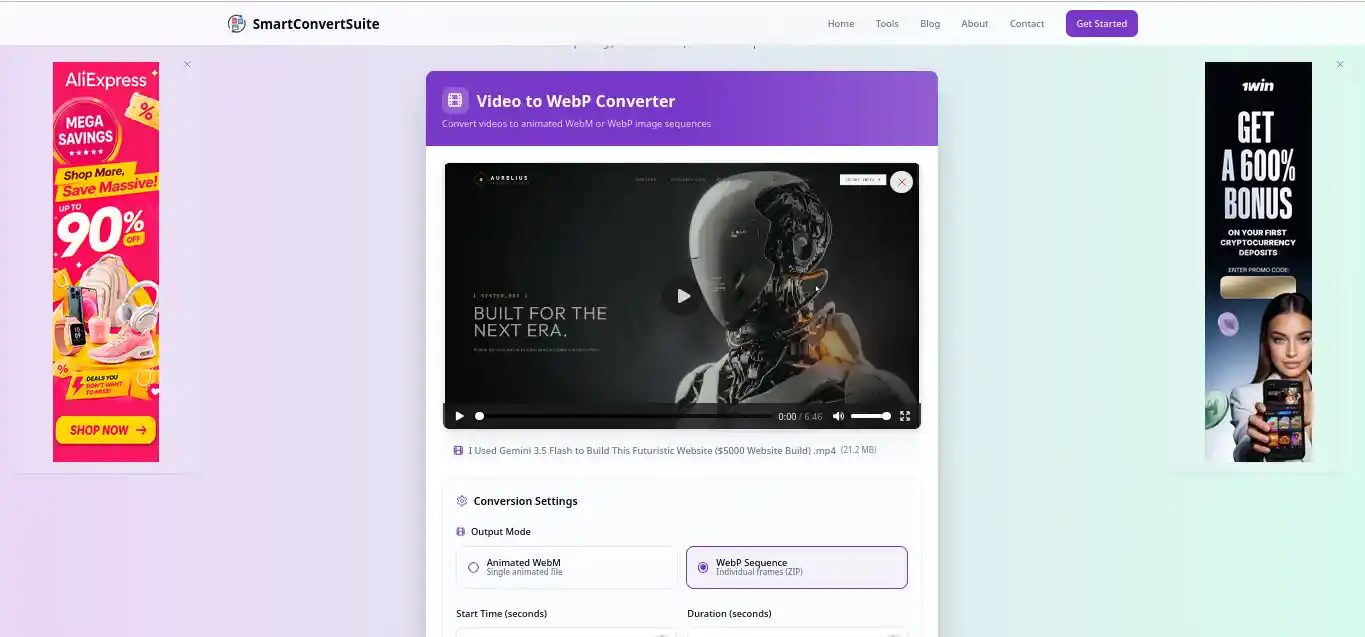
Choose the frame rate deliberately. A six-second clip at 24 FPS produces 144 images. Dropping to 12 FPS cuts the number in half, which may still look smooth when the visitor controls the motion slowly. Test rather than assuming more frames are always better.
Extract the ZIP and preserve zero-padded file names such as:
assets/robo-animation/smartconvertsuite-frame-001.webp
assets/robo-animation/smartconvertsuite-frame-002.webp
assets/robo-animation/smartconvertsuite-frame-003.webp
Before shipping, consider converting to WebP or AVIF and compare total weight and decoding performance. Keep one compressed poster image outside the sequence for instant display and fallback.
Step 9: Open the Repository in Google Antigravity
Open the cloned project as a dedicated Antigravity workspace and copy the extracted frame directory into the assets folder. The video shows the full frame list in the Explorer and Gemini 3.5 Flash selected in the agent panel.
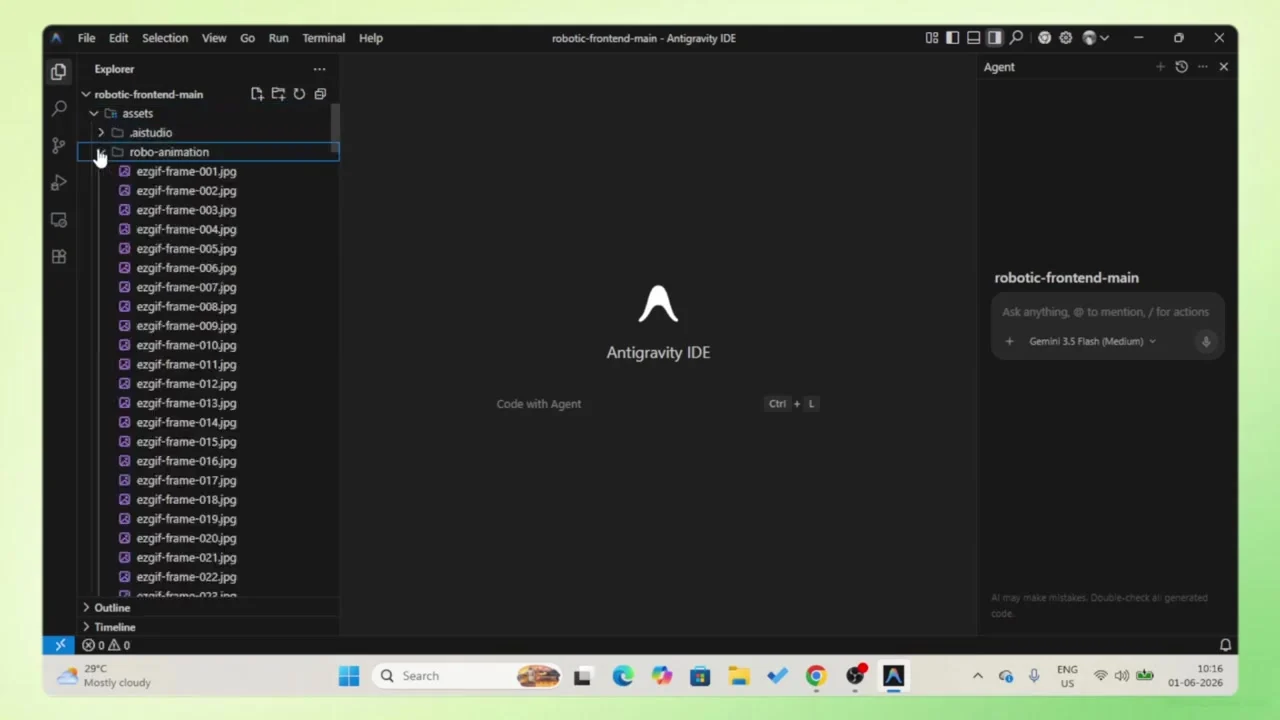
Commit or back up the project before prompting the agent. Review every terminal command, especially package installation and file operations. Restrict the workspace to this repository rather than opening a parent directory containing unrelated work.
Step 10: Ask Gemini 3.5 Flash to Connect the Frame Sequence
Tell the agent where the frames are, how many exist, where the canvas belongs, how scroll progress should map to frames, and what must happen while files are still loading. A vague instruction such as “make the robot animate” leaves too many architectural decisions unstated.
The implementation should include:
- A canvas or image layer sized to the hero container.
- A deterministic function that builds each frame path.
- A poster visible before the first frame is ready.
- Progressive loading rather than one blocking preload.
- A requestAnimationFrame loop that avoids redrawing unnecessarily.
- Correct aspect-ratio cropping and device-pixel-ratio handling.
- Resize handling without stretching the robot.
- A reduced-motion mode that disables scrubbing.
- Error handling when one or more frames fail.
Ask the agent to launch the site, inspect the browser console, test mobile and desktop widths, and provide a short summary of changed files and remaining limitations.
Step 11: Refine the Interaction in Focused Passes
Do not combine typography, animation, mobile layout, performance, and content changes in one prompt. Use small passes that are easy to review:
- “Keep the android’s eye in the right third of the viewport at every width.”
- “Map the full sequence to 160vh of scroll and clamp the frame index.”
- “Load the poster and first eight frames immediately, then load neighboring frames during idle time.”
- “Disable the canvas sequence for reduced-motion users and remove the extra scroll distance.”
- “At 390×844, move the headline below the navigation and prevent overlap with the robot.”
- “Report the total size of the production frame directory.”
Step 12: Test the Finished Website
Production Test Checklist
- The page becomes readable before the full animation downloads.
- Scrolling quickly forward and backward never produces a blank canvas.
- The hero uses a sensible crop on phones and ultrawide screens.
- All copy and controls remain real HTML elements.
- Keyboard focus is visible and the menu works without a mouse.
- Reduced-motion mode presents a complete static experience.
- There are no missing frames, console errors, or network 404s.
- Buttons and internal navigation reach valid destinations.
- Claims, testimonials, and technical specifications are verified.
- The production build works with a cold cache on mobile throttling.
Copy and customize
Complete Prompt for the Futuristic 3D AI Website
Use this after placing the poster and ordered frames in the repository. Replace the bracketed values and ask the agent to present its plan before editing.
Build a production-ready futuristic one-page website for [BRAND].

Goal and audience:
- The site presents [PRODUCT OR SERVICE] to [AUDIENCE].
- Primary conversion: [REQUEST ACCESS / BOOK DEMO / CONTACT SALES].
- Tone: precise, premium, calm, technical, and credible.

Existing project:
- Keep the current framework and package manager.
- Review the current components before changing architecture.
- Do not add dependencies unless they remove meaningful complexity.
- Show an implementation plan before editing files.

Visual system:
- Near-black charcoal background, off-white text, restrained amber accents.
- Editorial typography with strong hierarchy and generous spacing.
- Avoid excessive glow, gradients, floating cards, and generic sci-fi copy.
- Use the supplied robot poster as the immediate hero fallback.

Page structure:
1. Sticky accessible navigation.
2. Hero with one H1, concise description, and primary CTA.
3. Capabilities and system design.
4. Methodology or process section.
5. Evidence, use cases, or verified metrics.
6. Request-access form or contact CTA.
7. FAQ and footer.

Frame animation:
- Frames are located at assets/robo-animation/SmartConvertSuite-frame-###.webp.
- Detect or verify the exact frame count.
- Render frames to a canvas behind the hero's semantic HTML content.
- Map scroll progress to the frame index and clamp it safely.
- Preserve aspect ratio using cover-style cropping.
- Show assets/robot-poster.webp before frames load.
- Preload only a small critical group, then prioritize nearby frames.
- Do not block the page while the entire sequence downloads.
- Handle failed frames without leaving a blank hero.
- Respect prefers-reduced-motion by showing the poster and disabling scrubbing.

Responsive and accessible behavior:
- Test 390×844, 768×1024, 1440×900, and 1920×1080.
- No horizontal overflow or text overlap.
- Keep controls at least 44 pixels high.
- Add visible focus states and correct landmarks.
- Keep all meaningful text and CTAs outside canvas.

SEO:
- Add a unique title, meta description, canonical placeholder,
  Open Graph metadata, semantic headings, and descriptive link text.
- Do not add schema for content that is not visible on the page.

Verification:
- Run the development and production builds.
- Test links, navigation, animation, resizing, reduced motion, and mobile layout.
- Report changed files, installed dependencies, console errors,
  production asset size, and any remaining limitations.
Turn the Prototype into a Public Website
After the production build passes your tests, connect a custom domain and publish it on a hosting environment suited to the project’s runtime.
Implementation detail
How Scroll-Controlled 3D Frame Animation Works
The browser is not calculating a 3D scene. It is displaying a series of pre-rendered viewpoints. JavaScript measures progress through a chosen scroll distance, converts that value into a frame index, and draws the corresponding image.
const progress = Math.min(1, Math.max(0, scrollY / animationDistance));
const frame = Math.round(progress * (frameCount - 1));

if (frame !== lastRenderedFrame && images[frame]?.complete) {
  drawCover(ctx, images[frame], canvas.width, canvas.height);
  lastRenderedFrame = frame;
}
Why use canvas?
Canvas lets the site reuse one visual surface while switching source frames. It avoids adding hundreds of image elements to the DOM and gives direct control over cover-style scaling. The tradeoff is that canvas content is not semantic, so all meaningful content must remain in HTML.
Do not preload the entire sequence synchronously
A simple implementation often creates every Image immediately and waits for all downloads. That may look fine on a developer’s connection but can stall the hero on mobile. Load the poster and first frame first, then a sparse set of key frames, then nearby frames based on current scroll position. Use idle time for the remainder.
Account for device pixel ratio carefully
A high-density screen may require a larger canvas backing buffer for sharp output. Capping the effective pixel ratio can prevent extreme memory and rendering costs. The source frames should still be no larger than the maximum useful display dimensions.
Choose the right rendering method
Frame Sequence vs. Real-Time Three.js 3D
| Requirement | Frame Sequence | Three.js / WebGL |
|---|---|---|
| Art-directed cinematic motion | Excellent | Possible, but requires camera and animation work |
| Free rotation and inspection | Not suitable | Excellent |
| Photorealistic generated effects | Easy to pre-render | Requires models, textures, lighting, shaders, or baked footage |
| Download pattern | Many image files | Model, textures, environment maps, and code |
| Runtime GPU demand | Lower, mainly image decode and canvas draw | Potentially high and device-dependent |
| Dynamic configuration | Limited to pre-rendered states | Strong |
| Implementation complexity | Moderate | Higher |
Use Three.js when the visitor needs to orbit around a product, select materials, manipulate parts, or enter a dynamic scene. A typical pipeline uses a GLB or glTF model, GLTFLoader, a perspective camera, physically based materials, carefully limited lights, and a render loop. Production projects may also use Draco geometry compression and KTX2 compressed textures.
Use a frame sequence when the story follows one controlled camera move and visual fidelity matters more than free interaction. It is often the more reliable choice for a marketing hero because every frame has already been art-directed and rendered.
Keep the spectacle usable
Performance Optimization for Futuristic 3D Websites
A visually expensive site should not make the visitor pay with a blank screen, overheated phone, or unresponsive scroll. Measure on real devices and a cold cache.
Optimize the frame directory
- Resize frames to the largest dimensions actually rendered.
- Test WebP or AVIF against JPG rather than assuming one always wins.
- Reduce frame rate when the motion remains acceptable.
- Delete duplicate or nearly identical frames.
- Use long-lived immutable caching for versioned frame URLs.
- Keep mobile-specific frames smaller when a separate sequence is justified.
Protect Core Web Vitals
Display the poster immediately so the hero has a stable Largest Contentful Paint candidate. Give the hero explicit dimensions to avoid layout shift. Keep scroll handlers passive and move visual updates into requestAnimationFrame. Avoid expensive blur and large translucent layers over the entire viewport.
Offer graceful fallbacks
If JavaScript fails, show the poster and full HTML content. If a frame fails, retain the previous good frame. If the visitor requests reduced motion, disable the animation and unnecessary scroll distance. If the device is underpowered or data saving is active, prefer a smaller asset or static scene.
Make the experience findable and inclusive
SEO and Accessibility for an AI 3D Website
SEO essentials
- Use one descriptive H1 that states the product or offer.
- Write a unique title and meta description rather than generic futuristic slogans.
- Keep product information and headings in HTML, not inside the canvas or image.
- Add a canonical URL after the live domain is known.
- Create a useful Open Graph image and social description.
- Use internal links with descriptive anchor text.
- Add structured data only for visible, accurate content.
- Ensure important content is available before animation assets finish loading.
Accessibility essentials
- Honor
prefers-reduced-motion. - Maintain text contrast over every frame or add a stable contrast layer.
- Give the canvas an appropriate accessible treatment and expose equivalent information in HTML.
- Use actual buttons and links, not click handlers on generic containers.
- Provide visible focus states and logical keyboard order.
- Do not trap scroll or make reading depend on completing the animation.
For a broader process that works across different AI tools, see how to create a website with AI. For an agent-first alternative that starts from a local coding workspace, read how to create a website using Google Antigravity.
Publish the finished build
How to Host the Futuristic 3D Website on Hostinger
Choose deployment based on the output, not the tool that generated it. A static production build can live on normal web hosting. A project that requires a persistent Node server, private API calls, or server rendering needs a compatible application environment or VPS.
Get Hosting for the Production Website
Use Hostinger to connect a domain, enable SSL, publish the optimized build, and manage the public website.
Option 1: Upload a static production build
- Install dependencies and run the production build.
- Preview the generated output locally.
- Confirm frame paths and other assets work without the development server.
- Open Hostinger hPanel and the site’s File Manager.
- Upload the contents of the production output directory to
public_html. - Ensure the homepage entry file is at the root.
- Connect the domain, enable SSL, and test HTTPS.
npm install
npm run build
npm run preview
The output folder is commonly dist, but verify the project configuration. Upload the contents of that directory, not the entire development repository.
Option 2: Deploy from Git
Hostinger’s official Git deployment guide says to choose the correct repository and branch. Leaving the install path empty deploys to /public_html, and the target directory must be empty before the initial deployment. Confirm whether your workflow deploys already-built files or needs a separate build process.
Option 3: Use a Hostinger VPS
Use a VPS when the project needs a Node runtime, server rendering, private Gemini calls, a database, or custom background services. Configure a process manager, reverse proxy, firewall, SSL, environment variables, monitoring, updates, and backups. Never put a private Gemini API key in browser-delivered JavaScript.
Verify the live site
- Open the site on mobile data and a desktop connection.
- Confirm every frame returns a successful response.
- Inspect compression and caching headers.
- Check the canonical and social URLs use the live domain.
- Test the reduced-motion experience.
- Verify forms and analytics under the site’s consent rules.
Launch the AI-Generated Website
Publish the tested production build, attach your domain, enable SSL, and verify the complete animation on the public URL.
Avoid expensive errors
Common Mistakes When Building AI 3D Websites
Calling every animated image “real 3D”
Use accurate language. A frame sequence is pre-rendered motion; a Three.js scene is real-time rendering. The right technique depends on interaction requirements.
Generating visuals before deciding where copy goes
A centered subject may leave no readable space for an H1. Prompt for negative space and mobile cropping from the beginning.
Using too much motion
Rapid camera moves and changing anatomy create unstable scroll playback. Slow, reversible motion works better.
Preloading every frame before rendering the page
This produces a long blank screen. Show the poster first and load frames progressively.
Allowing AI to invent technical claims
The reference design uses fictional engineering language. Production copy must be verified, legally appropriate, and meaningful to the actual audience.
Keeping secrets in frontend code
Anything sent to the browser can be inspected. Private API calls belong on a server with restricted environment variables.
Skipping version control
Commit before agent-driven changes. A fast AI refactor is only useful when it can be reviewed and reversed.
Assuming a visually impressive site is worth a fixed price
Project value depends on strategy, original art rights, content, responsiveness, accessibility, performance, integrations, testing, support, and business results. AI speed does not establish a guaranteed dollar value.
Questions answered
Frequently Asked Questions
Can AI build a futuristic 3D website?
Yes. AI can generate the design direction, CGI assets, motion, initial website, and animation code. You still need to review originality, content accuracy, performance, accessibility, security, and production behavior.
Is the robot website real-time 3D?
No. The demonstrated workflow uses pre-rendered CGI frames extracted from a video. JavaScript changes the displayed frame as the visitor scrolls, creating a 3D-style effect without loading an interactive mesh.
Which tools are used in the workflow?
The video uses planning and design references, Google Flow for image and video generation, Google AI Studio for the first website, GitHub for export, SmartConvertSuite for frame extraction, and Gemini 3.5 Flash inside Google Antigravity for local refinement.
Why use JPG frames for the animation?
JPG frames are easy to extract and decode, especially for photographic CGI. WebP or AVIF may reduce transfer size, but you should test quality, total weight, and browser decoding rather than converting blindly.
Do I need Gemini 3.5 Flash?
No. It is a strong fit because Google designed it for agentic and coding workflows, and it appears in the video. Another capable coding model can implement the same sequence when given a precise specification.
Can I host the site on Hostinger?
Yes. Upload a static production build to public_html or deploy it from Git. Use a suitable VPS or compatible runtime when the application needs a persistent Node server or private backend integration.
How many frames should a scroll animation use?
There is no universal number. Start from the clip duration and motion complexity, then test a lower frame rate. A controlled six-second movement may work with 72 to 144 frames. More frames increase request count, storage, memory, and decoding work.
When should I use Three.js?
Use Three.js when visitors must rotate, inspect, configure, or directly manipulate a real 3D object. Use a frame sequence when the camera path and final appearance should remain tightly controlled.
Final recommendation
Is This the Right Way to Build Your Futuristic Website?
The workflow is an excellent fit for a product launch, creative portfolio, concept brand, or technology landing page that needs one cinematic, art-directed moment. It lets AI accelerate concept art, motion, and frontend development without requiring a complete 3D production pipeline.
Use it with discipline. Begin with the message, generate visuals for the layout rather than around it, keep motion subtle, and treat the frame sequence as progressive enhancement. Build a fast static fallback, preserve semantic HTML, and test outside the ideal desktop environment.
If the product must be explored from any angle, configured in real time, or placed in an interactive scene, move to a true Three.js or WebGPU architecture. The best engineering choice is the simplest technique that delivers the required experience reliably.
Ready to Publish Your Futuristic Website?
Use Hostinger to connect your domain, serve the optimized production build, enable SSL, and put the finished AI website online.
Related Guides
Sources and Further Reading
- Google: Gemini 3.5, Frontier Intelligence with Action
- Google AI for Developers: Gemini 3.5 Flash
- Google AI for Developers: Build Apps in Google AI Studio
- Google Developers Blog: Build with Google Antigravity
- Google Flow Official Website
- Three.js Official Documentation
- Reference Video: Futuristic Website with Gemini 3.5 Flash
- Akshy Stack YouTube Channel
AI model names, interfaces, limits, availability, and pricing can change. Verify the current options in official Google and Hostinger documentation before beginning a production project.