How to fix the ERR_TOO_MANY_REDIRECTS on Plesk
Are you seeing this error (ERR_TOO_MANY_REDIRECTS) when trying to access your website URL?

We just resolved the same issue on a client’s website. His website is hosted on a Plesk panel.
There are a few ways to go around this problem. I will not bother you with the general solutions such as clearing your browser’s cache, which I am pretty sure you have already tried.
This is the error he kept seeing while trying to access his site via Chrome browser;
This page isn’t working. domain redirected you too many times.

How to fix the ERR_TOO_MANY_REDIRECTS on Plesk
Try each step at a time, and check whether the error is gone.
Check the nature of the Redirect Loop.
Before trying anything try to test your domain name with a free tool like redirect-checker.org to discover what the issue might be originating from.

For example, this client’s website was experiencing 19 redirections, which were responsible for an endless redirect loop that restricted him from accessing his site.

SSL issue: Do not force http-https before issuing an SSL Certificate
Do not force HTTP – https redirection before issuing your website with an SSL certificate. The client had replaced his old domain name with a new one and in the process disconnected the old SSL certificate and failed to disable the direction rules on his Plesk panel.
He, later on, issued a Cloudflare SSL certificate, but the error was already created which made it impossible to access his website.
To resolve ERR_TOO_MANY_REDIRECTS on Plesk due to an SSL issue, follow these steps:
- Log in to your Plesk panel.
- Next to your domain click Hosting & DNS, then click Hosting Settings.
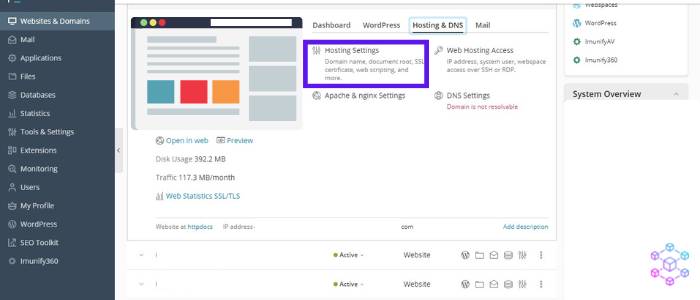
- Change the Preferred domain value to None and click OK
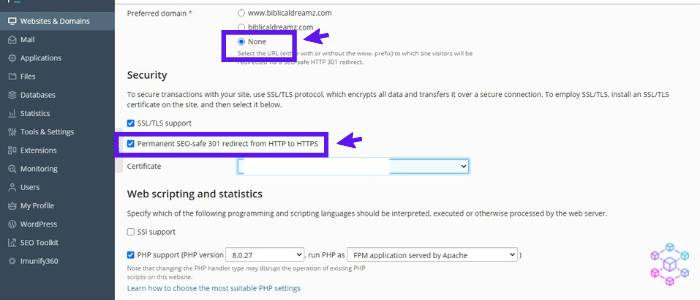
- Disable the ‘Permanent SEO-safe 301 redirect’ option
- You should also remove any redirect rules in the ‘Apache & Nginx Settings’.
Once the redirect loop error (ERR_TOO_MANY_REDIRECTS) is fixed, you can successfully enable HTTP – HTTPS redirection to avoid an SSL warning when visiting your website. I will show you how to do that in the last steps below.
Related: How to Fix Image Elements Do Not Have Explicit Width and Height
Disable Cloudflare DNS Proxy
If you are using Cloudflare for DNS management, disable the proxy option in your root (@) record ans set it to DNS only. This should solve the error.

Clear Server and Proxy (CDN) Cache
Clear server cache
If you cannot access your WordPress site, you can manually clear your site’s cache on your Plesk panel by clicking on the ‘refresh’ button on the top menu. Afterward, check if the redirect loop is gone.
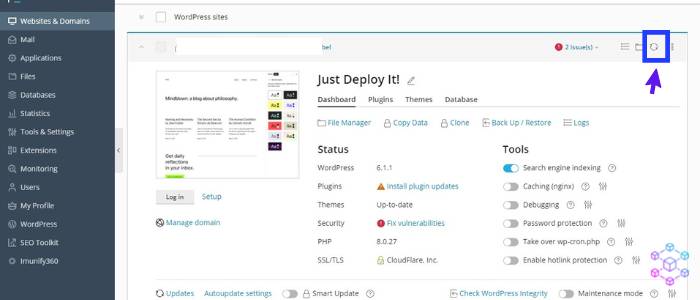
Clear Cloudflare cache
If you are utilizing a reverse proxy service like Cloudflare or any other CDN, clear your site’s cache by purging everything. This will allow the CDN to fetch a fresh copy of your website’s content.
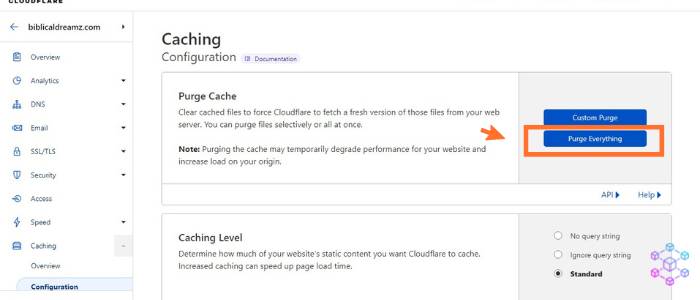
Change the DNS records of the old domain
If you just migrated your website to a new domain or change it directly on Plesk, you should consider disabling DNS records for the old domain to avoid conflicts.
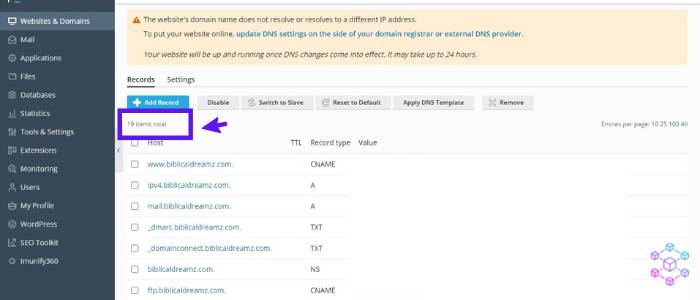
The 19 redirect errors that were occurring were due to the old website’s 19 DNS records. Make sure to clear these records and point your old domain to the new server IP address or simply create a 301 redirection on the domain register level.
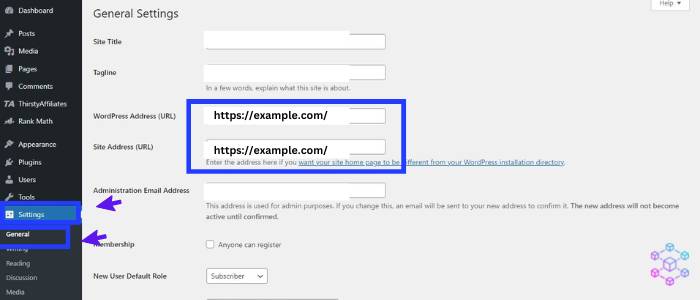
Change your WordPress website URL settings
If you can still access the WordPress admin dashboard, make sure your WordPress Address (URL) and Site Address (URL) are the same, and that the URL is the intended one, not the old one.
Edit .htaccess file using Rank Math SEO plugin
If you still have access to your WordPress admin dashboard, then consider editing your .htaccess file using Rank Math. This is a safe and convenient way.
This will enable you to redirect all the old website’s content to the new site. Make sure you still own both domains.
To do this, follow these simple steps:
- Login to your WordPress admin dashboard
- On the right sidebar, click Rank Math > General settings
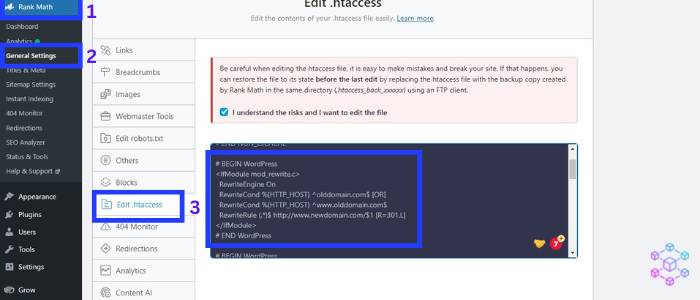
- Choose the ‘Edit .htaccess file’ option and add the following code to redirect all your old domain content to the new domain.
# BEGIN WordPress
<IfModule mod_rewrite.c>
  RewriteEngine On
  RewriteCond %{HTTP_HOST} ^olddomain.com$ [OR]
  RewriteCond %{HTTP_HOST} ^www.olddomain.com$
  RewriteRule (.*)$ http://www.newdomain.com/$1 [R=301,L]
</IfModule>
# END WordPress
Change “olddomain.com” and “newdomain.com” with the real domain names. If in any case an error occurs, just login into your hosting panel and restore the old backup.
Rank math will automatically create a backup when making any changes to the .htaccess file. Use this backup for restoration purposes.
Change the redirects rule on your server
Use this method to change the misconfiguration of the server’s config files.
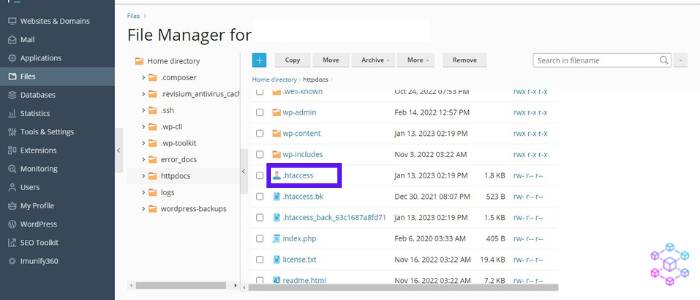
Edit your .htaccess file on Apache on Plesk
To do this, login into your panel,
- Choose the new domain you are working on
- Under ‘Dashboard’ click ‘File Manager’ to access your site’s files

- Choose the ‘.htaccess’ file and download the old copy before adding the following command to reset your .htaccess file. However, if you are interested in redirecting the old domain URLs to a new domain, then, use the above code.
# BEGIN WordPress
<IfModule mod_rewrite.c>
RewriteEngine On
RewriteBase /
RewriteRule ^index\.php$ - [L]
RewriteCond %{REQUEST_FILENAME} !-f
RewriteCond %{REQUEST_FILENAME} !-d
RewriteRule . /index.php [L]
</IfModule>
# END WordPress
Change Nginx Configuration on Plesk
Plesk makes it easy to add any Nginx configuration and redirection rules on your server without touching any line of code.
How to change Nginx Configuration on Plesk
- On your Plesk panel, click on the ‘Hosting & DNS’ option.
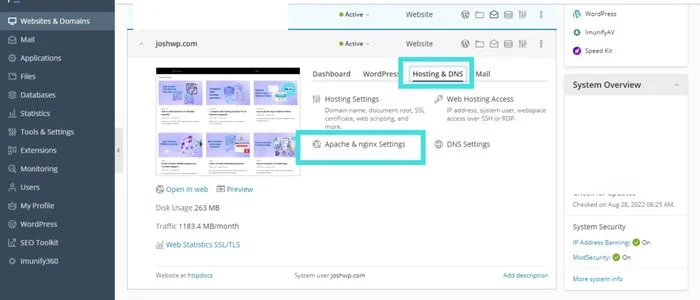
- Then click on the ‘Apache & Nginx Settings’ box.
- Scroll down to the ‘Additional Nginx Directives’ option and paste this code
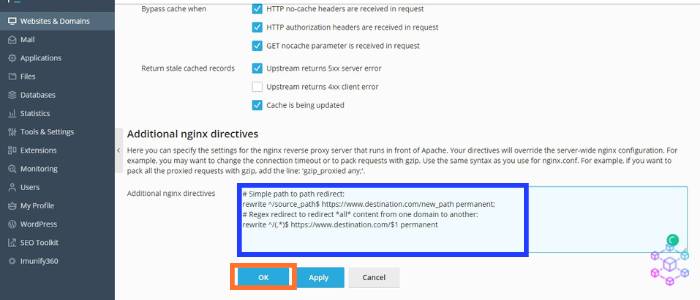
# Simple path to path redirect:
rewrite ^/source_path$ https://www.destination.com/new_path permanent;
# Regex redirect to redirect *all* content from one domain to another:
rewrite ^/(.*)$ https://www.destination.com/$1 permanent;- Click ‘Okay’ to save changes.
Change http to https redirects on the server
Use this method to resolve a misconfiguration of https redirect rules on your server.
Enable http to https redirects on Plesk
Once you have issued your website with a valid SSL certificate, make sure to redirect all the http traffic to https. This will also avoid an SSL warning while visiting your website. This is also beneficial for SEO as google rewards websites with a valid SSL certificate.
How to enable https in Plesk:
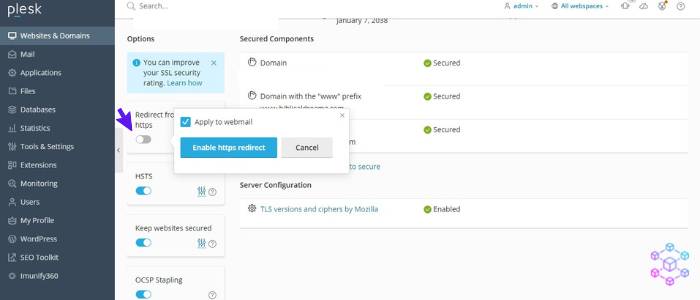
- On your domain name, click ‘Dashboard’

- Under security ‘click SSL certificate’
- Now click on the ‘Redirect from http-https’ button to enable https redirect on Plesk
Change http to https redirects in Plesk or Nginx using SSH
If you want to achieve this using SSH, you can use these two methods
How to change HTTP to HTTPS redirects on Plesk using SSH
- Login to your server via SSH as the root user.
- Navigate to the directory where your website’s Apache configuration files are located. This is usually in the
/var/www/vhosts/directory. - Open the Apache configuration file in a text editor. The file is typically named
httpd.includeand located within your website’s directory. - Find the
VirtualHostsection for the website you want to configure. - Within the
VirtualHostsection, add the following lines of codes to redirect all HTTP traffic to HTTPS:
RewriteEngine On
RewriteCond %{HTTPS} !=on
RewriteRule ^/?(.*) https://%{SERVER_NAME}/$1 [R,L]
- Make sure to save the file and exit the text editor.
- Restart Apache for the changes to take effect:
service apache2 restart- This should redirect all the traffic to HTTPS.
How to Change http to https redirects on Nginx using SSH
- Login to your server via SSH using your preferred terminal or PuTTY.
- Navigate to the Nginx configuration directory using the command
cd /etc/nginx- Open the Nginx config file using a text editor, such as nano, vim, or Notepad: nano nginx.conf
- Locate the server block that corresponds to the website you wish to redirect from HTTP to HTTPS. It should be similar to this;
server {
    listen 80;
    server_name example.com;
    root /var/www/example.com;
    index index.html;
}
- Change the listen port from 80 to 443, and add the following code to the server block:
    listen 443 ssl;
    ssl_certificate /path/to/ssl/certificate;
    ssl_certificate_key /path/to/ssl/key;
- Add a new server block that listens on port 80 and redirects all requests to the HTTPS version of your website.
server {
    listen 80;
    server_name example.com;
    return 301 https://$host$request_uri;
}
- Do not forget to save and close the config file.
- Now test the changes by running this command
nginx -t- If the config file is valid, you can restart the Nginx service using this command
systemctl restart nginx- Verify that the redirection is working by visiting your site using HTTP and check whether it successfully redirects to the HTTPS version.
Once you are done, you can verify your SSL certificate using the Qualys SSL Labs free tool on your Plesk panel.
I know this was a lot to take in, however, I hope it has helped you find a way on how to fix the ERR_TOO_MANY_REDIRECTS on Plesk. The same approach can be used to resolve a redirect loop on any server.
Disclosure: We may earn commission for purchases that are made by visitors on this site at no additional cost on your end. All information is for educational purposes and is not intended for financial advice. Read our affiliate disclosure.


