How to enable TLS 1.2 and TLS 1.3 in Plesk panel
Have you been seeing an SSL warning on your site and wondering how to enable TLS 1.2 and TLS 1.3 in Plesk panel?
Plesk is a popular control panel for managing web hosting environments. It allows you to easily manage your websites, emails, and databases, as well as other aspects of your hosting environment.
Transport Layer Security (TLS) is a cryptographic protocol that provides secure communication over the internet. It is the successor to Secure Sockets Layer (SSL), and is used to secure communication between a client (e.g. web browser) and a server (e.g. website).
In this article, I will show you how to enable TLS 1.2 and TLS 1.3 in Plesk panel. There are two ways to resolve the issue depending on which version of Plesk you are using.
Related: How to disable TLS 1.0 and enable TLS 1.2 and TLS 1.3 in Linux?
Here are the steps to disable TLS 1.0 and enable TLS 1.2 and TLS 1.3 in Plesk panel:
1. Enable TLS 1.2 and TLS 1.3 in Plesk panel
- Login to your Plesk panel
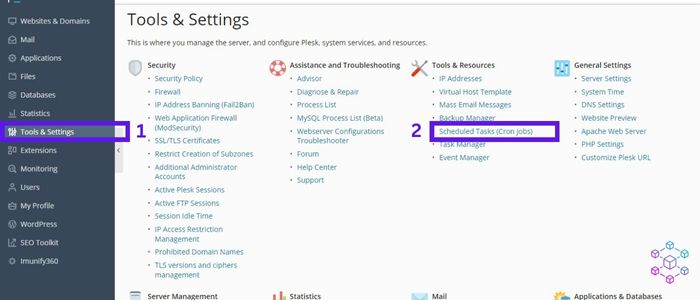
- Click on the “Tools & Settings” option,
- In the left menu, click on the ‘Scheduled Tasks’ option.
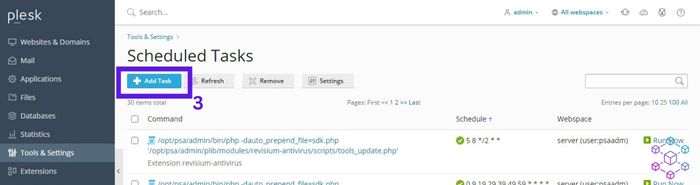
- Once in the scheduled task, Click ‘Add Task’
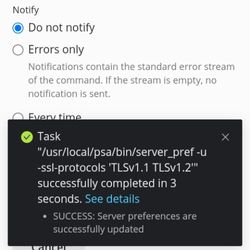
- Don’t change the default option (i.e. the ‘Run a command’ option is already selected). Now enter the command code below in the “Command” black section and click “Run Now”.
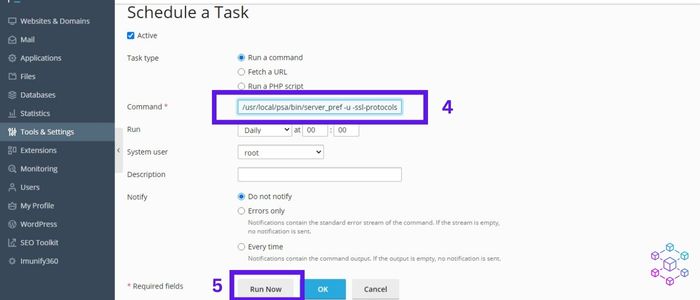
/usr/local/psa/bin/server_pref -u -ssl-protocols 'TLSv1.1 TLSv1.2'
or
/usr/local/psa/bin/server_pref -u -ssl-protocols 'TLSv1.1 TLSv1.3'
- Afterward, you will receive a status confirmation message
2. Enable TLS 1.2 and TLS 1.3 in older versions of Plesk panel
This option may not be available in the recent versions of Plesk. Hence, I recommend using the above method or resolving the issue on a command line.
- Login to your Plesk panel as an administrator.
- Click on the “Tools & Settings” icon in the top menu.
- In the left menu, click on the “Server Settings” option.
- In the “Server Settings” page, click on the “Security” tab.
- Under the “Security” tab, you will see the “SSL/TLS Settings” section.
- In the “SSL/TLS Settings” section, you can see the current TLS version that is enabled on your server.
- To disable TLS 1.0, simply uncheck the box next to “TLS 1.0”.
- To enable TLS 1.2 and TLS 1.3, check the boxes next to “TLS 1.2” and “TLS 1.3”.
- Click the “Apply” button to save the changes.
You have now successfully updated the TLS version in the Plesk panel.
3. Updating TLS versions in Plesk using the command line
Here are the steps to enable TLS 1.2 and TLS 1.3 in Plesk using the command line:
- Connect to your server via SSH as the root user.
- Run the following command to enable TLS 1.2:
plesk bin server_pref --update -tls1.2 true
- Run the following command to enable TLS 1.3:
plesk bin server_pref --update -tls1.3 true
- Restart the Apache web server for the changes to take effect:
service httpd restart
That’s it! You have successfully enabled TLS 1.2 and TLS 1.3 in Plesk panel using the command line.
Related: Nginx Rewrite rules for Rank Math Sitemap in Plesk
After making these changes, you should test your website to ensure that it is still accessible and functioning correctly. Some older web browsers and devices may not support TLS 1.2 or TLS 1.3, so you may need to adjust your settings accordingly.
By disabling TLS 1.0 and enabling TLS 1.2 and TLS 1.3, you can improve the security and performance of your website. This is crucial especially if you handle sensitive data and transactions on your website.
I hope this article has helped you to disable TLS 1.0 and enable TLS 1.2 and TLS 1.3 in Plesk panel. If you have any questions or need further assistance, feel free to ask.
Disclosure: We may earn commission for purchases that are made by visitors on this site at no additional cost on your end. All information is for educational purposes and is not intended for financial advice. Read our affiliate disclosure.