Maximizing Deployment on DigitalOcean via Cloudways: A Comprehensive Feature Guide
Introduction
Being new to cloud computing can be so burdensome when it comes to deploying a website on the cloud platform. However, with the right tools and guidance, this process could be simplified and made suitable for the highest efficiency.
In this extensive guide, we will explore the features and benefits of deployment on DigitalOcean through Cloudways; a managed cloud hosting platform that provides you with various tools and services to optimize your deployment.
10 Advantages of Cloudways Managed cloud hosting
Managed cloud hosting through Cloudways presents several advantages that make it an attractive option for businesses seeking a comprehensive solution for their hosting needs. Here are some of them:
- Scalability: With Cloudways, scaling is not difficult, especially in cases where there are varying traffic demands without experiencing any downtime hence accommodating rapid growth or changes in traffic during seasons.
- Security: There are robust security measures by Cloudways to protect your website and customer data, including automatic backups, firewalls, and intrusion detection systems that keep unauthorized access away.
- Performance Optimization: For performance optimization purposes, caching, content delivery networks (CDNs), and load balancing among others are offered by Cloudways.
- 24/7 Support: Cloudways has dedicated support for its customers, which guarantees that any issues are handled rapidly and competently. This also encompasses access to a wide-ranging knowledge base as well as a team of professionals who remain on call round-the-clock.
- Cost-Effectiveness: In this regard, Cloudways is operated on a pay-as-you-go principle hence you only have to pay for what you use. Such a feature is suitable for businesses with variable traffic or those in need of scalable hosting options.
- Flexibility: Cloudways supports different applications such as WordPress, Magento, and Laravel among others thus giving businesses the freedom to use their desired tools.
- Easy Management: For instance, Cloudways provides an easily manageable interface that simplifies server management allowing non-techies to handle their hosting environment effortlessly.
- Integration with Popular eCommerce Platforms: Some of the popular eCommerce platforms like Shopify, WooCommerce, and Magento are integrated into Cloudways making it ideal for businesses with online stores.
- Free Trials and Discounts: Besides a 3-day free trial offered by Cloudways to try out the platform before committing to the paid plan; they also provide discounts for new clients wishing to save on hosting fees.
- Robust Infrastructure: Cloudways leverages the robust infrastructure of DigitalOcean, ensuring that your website is hosted on a reliable and high-performance platform.
Why choose DigitalOcean on Cloudways for Your Website Deployment?
DigitalOcean on Cloudways is an option that comes with several benefits to clients who may want a hosting environment that is scalable, secure, and affordable. Some of these include:
- Scalability: DigitalOcean has a cloud infrastructure that enables you to adjust your resources as per your site’s traffic; thus, ensuring that it remains highly responsive.
- Security: DigitalOcean has several security features like automatic backups, firewalls, and intrusion detection systems that secure customer data as well as websites from potential risks.
- Cost-Effectiveness: The pay-as-you-go method of billing by DigitalOcean ensures that you only pay for the number of resources you use, making it an affordable path for those who need flexible hosting options.
- Performance Optimization: The cloud infrastructure at DigitalOcean is designed to ensure high-performance levels even during high-traffic times so your website loads faster.
- Easy Management: Cloudways simplifies server management through its user-friendly interface allowing even non-tech users to manage their hosting environment.
- Integration with Popular eCommerce Platforms: Cloudways integrates seamlessly with popular eCommerce platforms like Shopify, WooCommerce, and Magento, making it an ideal choice for businesses with online storefronts.
- Robust Infrastructure: Cloudways leverages the robust infrastructure of DigitalOcean, ensuring that your website is hosted on a reliable and high-performance platform.
- Advanced Tools and Integration: Cloudways offers a range of advanced tools and integration options, including custom automation with Cloudways API and Cron Job Manager for scheduled tasks.
Cloudways Sign Up and Setting Up
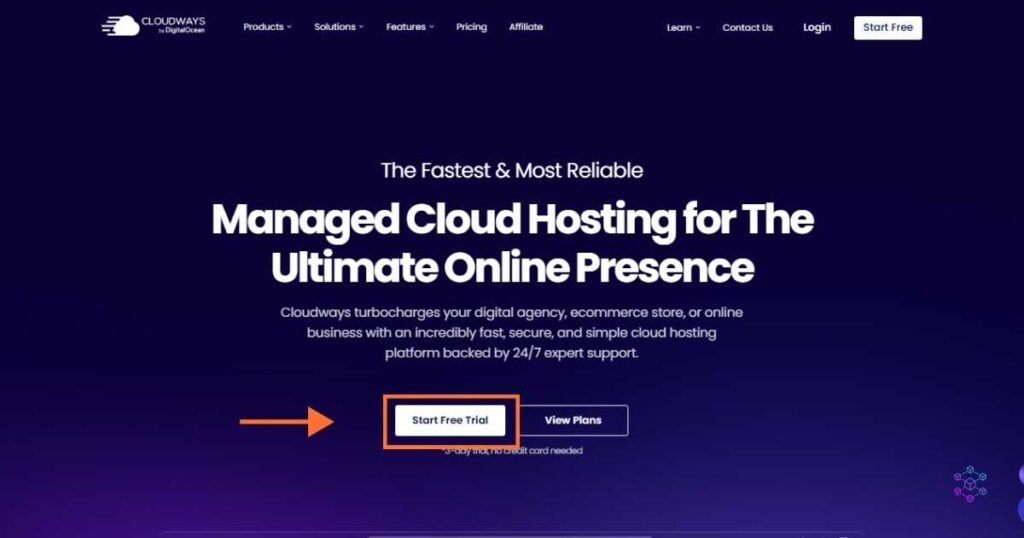
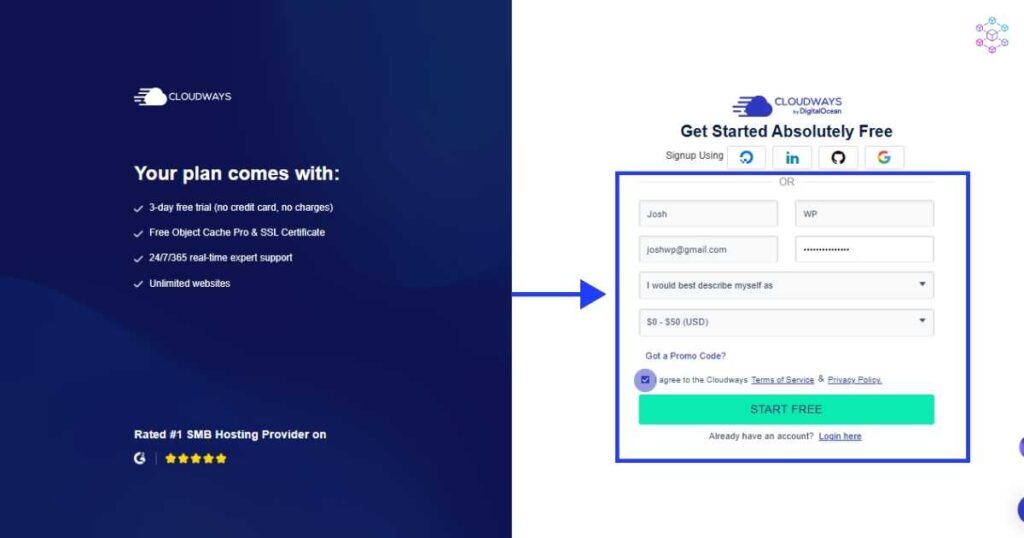
To get started with Cloudways, use this link to sign up for an account and get a 3-day free trial. You will be directed to the Cloudways signup page where you will need to fill in your details which include your name, email, and a strong password. Then click on the “start free” button.
On the next screen fill in your details (which include: your name, email address, and a strong password) to get started for free. Select an average monthly hosting spending on the drop-down menu, and check the terms of services box.
You will be prompted to verify your account by providing additional details. Make sure to fill in the accurate information and then, click on the submit button.

You will also receive an email that will prompt you to activate your account. Just click on the “activate account” button to be redirected to your account.
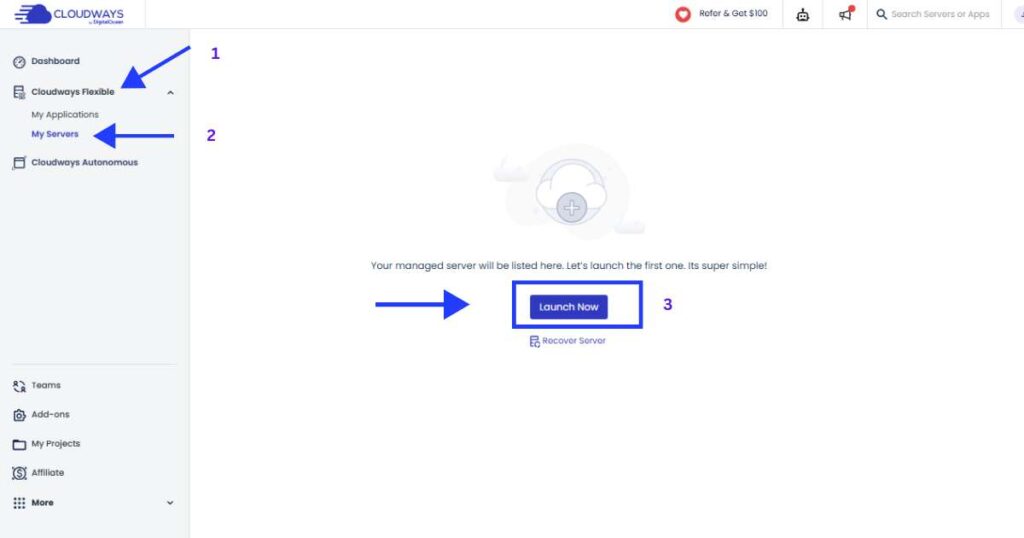
Now you can go ahead and launch your server. On the left menu, click on Cloudways Flexible > My Serve to add a new server. Now click on the “Launch” button
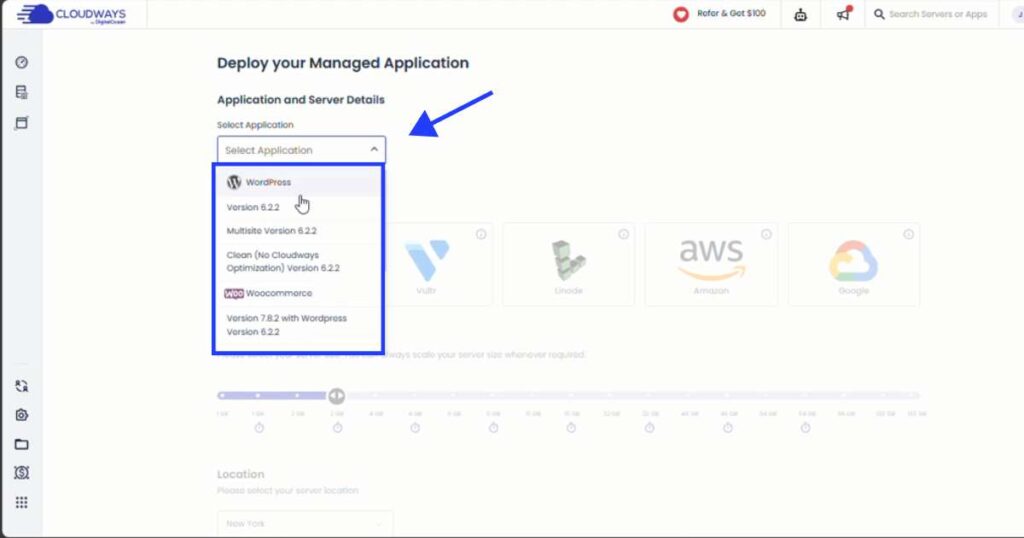
It’s time to choose an application of your choice, for most people it will be WordPress. You can give it a name of your choice for all three options, which include ‘app name’, ‘server name’, and ‘project name’. Now select your server provider.
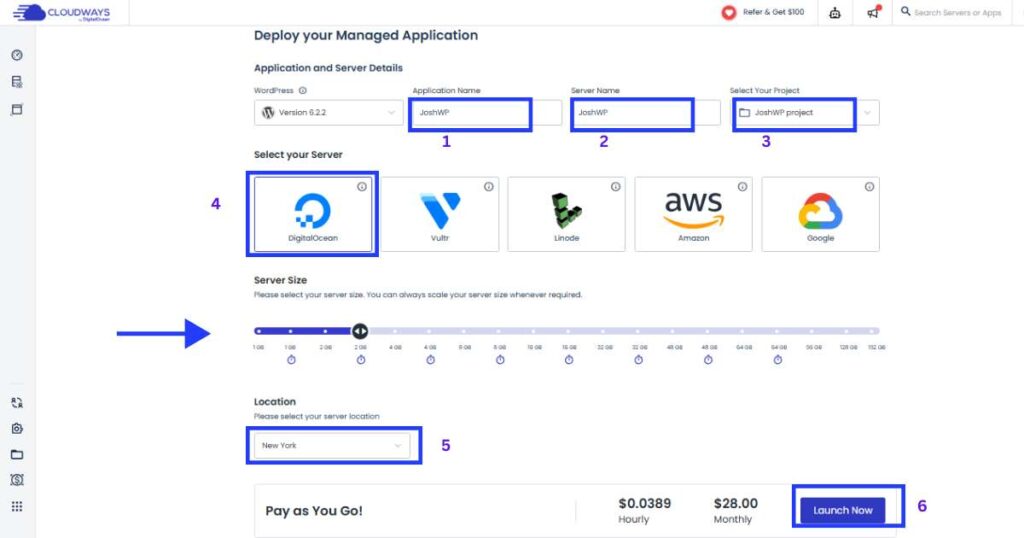
In the next step, select Digital Ocean as your server provider as shown in the image below.
Cloudways Server Configuration
Choose the appropriate server size depending on your needs in the “Server Size” section. Use the scroll bar to select different RAM sizes. 2GB is recommended for production websites.
It is wise to choose a server location close to your audience. You can do so by selecting a region on the “location dropdown menu” below the “server size” section. Refer to the image above.
Application and Site Management
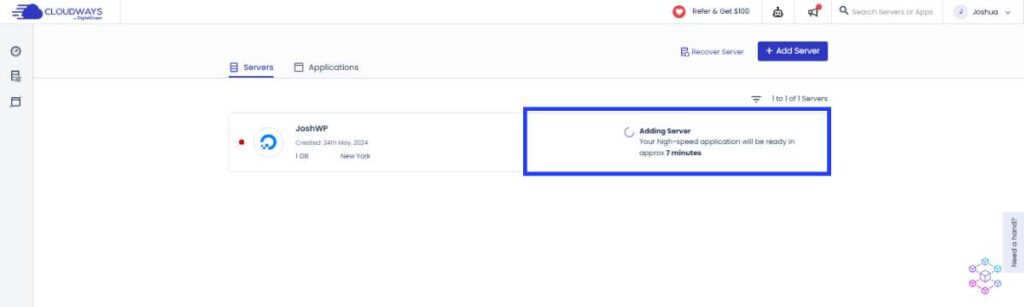
Once you are done with choosing your above options, click on the ‘Launch Now’ button, and your server will start setting itself up.
On the next screen, you can get access to your application (WordPress) by clicking on the “www” option on the right of the screen.
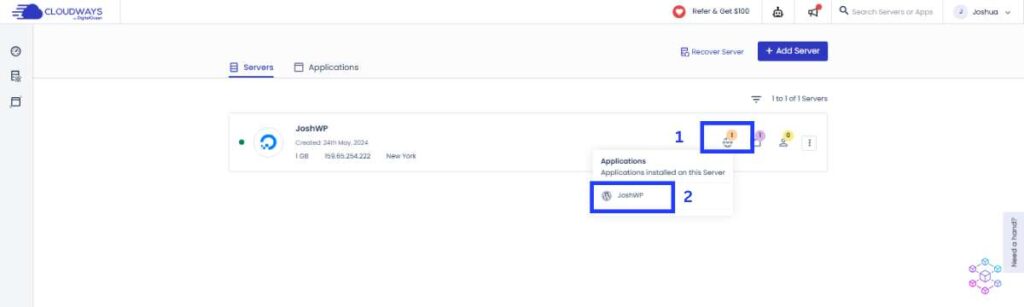
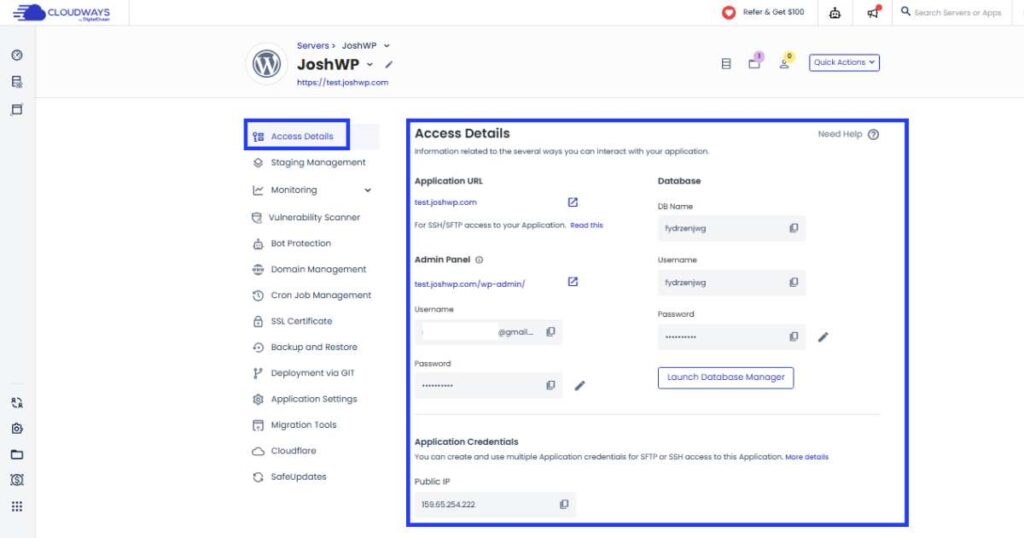
Now you will be directed to a new screen where you can manage your website (Application). Here you will see your access details, which include a staging URL for your website, Your server IP address, admin panel details (your username and password), and MYSQL database details.
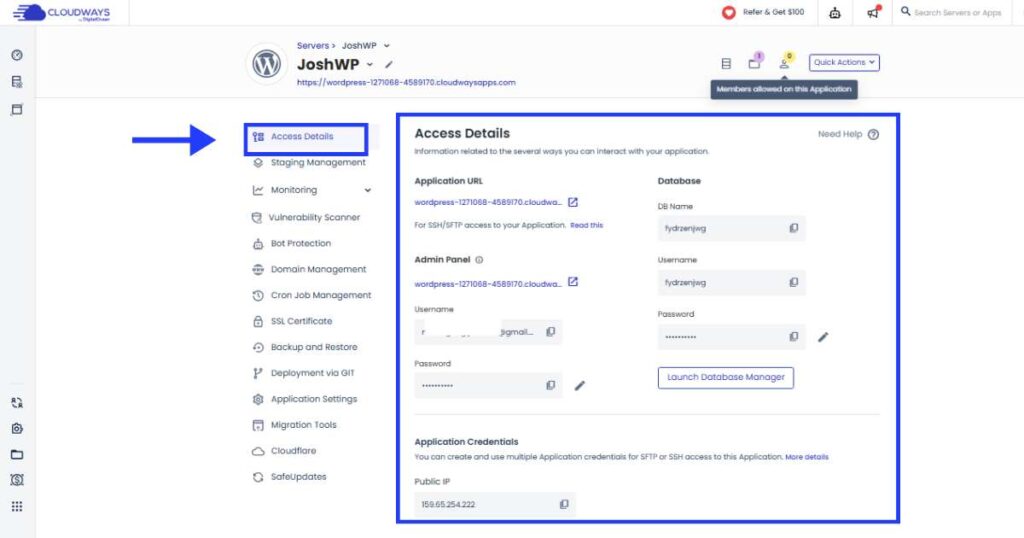
Use the staging URL to access your website. To view your WordPress dashboard, use the “Admin panel URL” and then enter your username and password.
Inside your WordPress dashboard, you can delete the plugins and themes you don’t need and replace them with those of your choice.
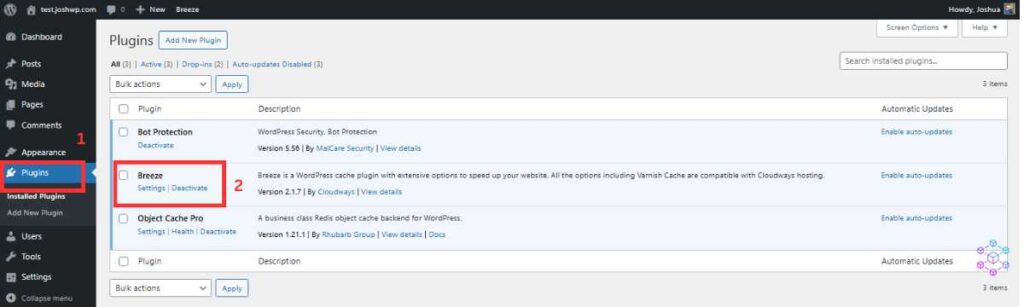
Your WordPress installation on Cloudways comes with a free Breeze plugin for enhanced performance.
How to configure the Breeze plugin
On your WordPress dashboard, visit the ‘plugins’ option > Breeze plugin > select the ‘settings’ option
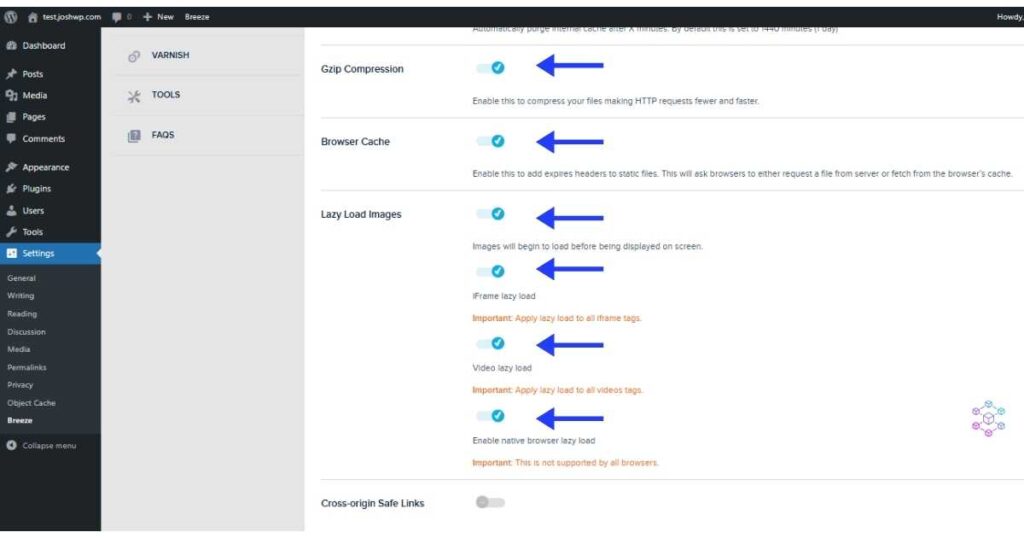
On the plugin’s dashboard, you will have several configuration options:
- Under the “basic option”, enable browser cache, lazy load images (elect all the options), and you can also enable the mobile cache button. Here are more details on the mobile caching option.

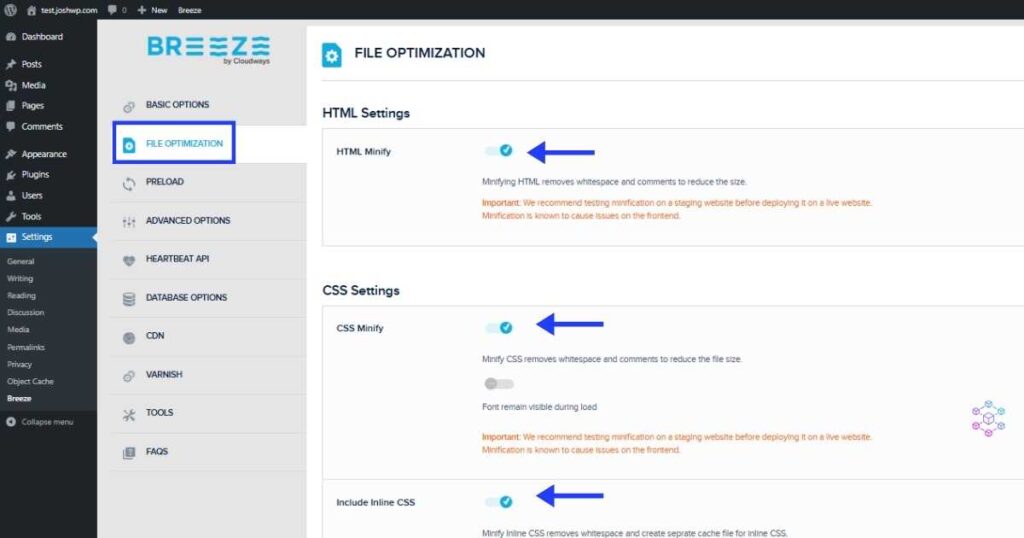
- Under the “file optimization”, enable HTML Minify, CSS Minify,
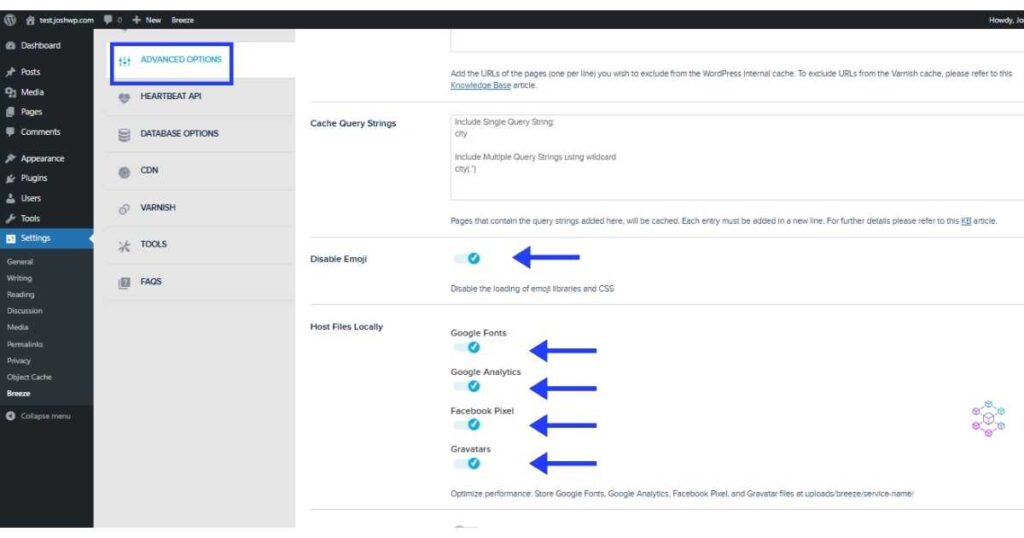
- On the “Advance options” section, disable Emoji and Host fonts locally options.
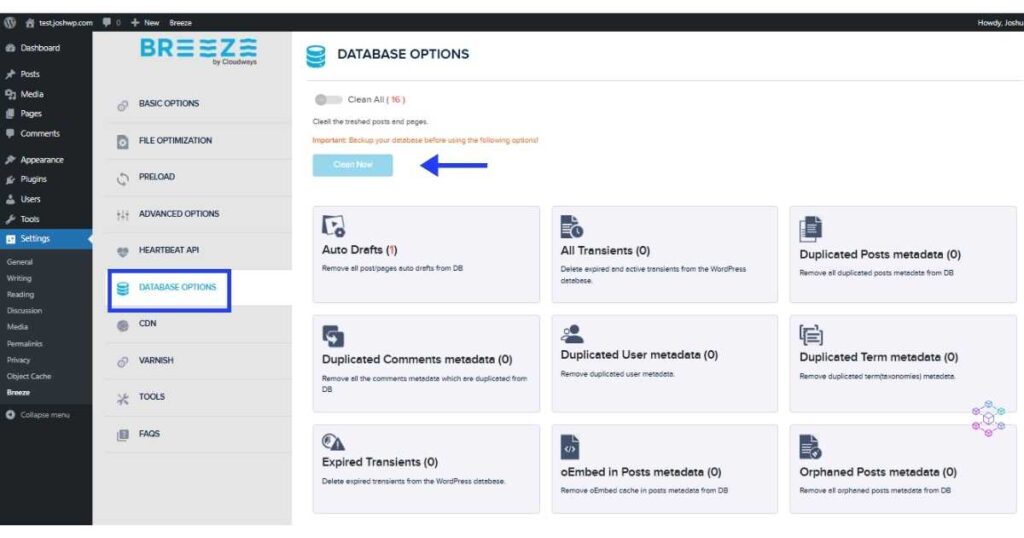
- The “Database Options” section gives you control over your website’s database. Here you can easily purge it by clicking on the “Clear Now” button.
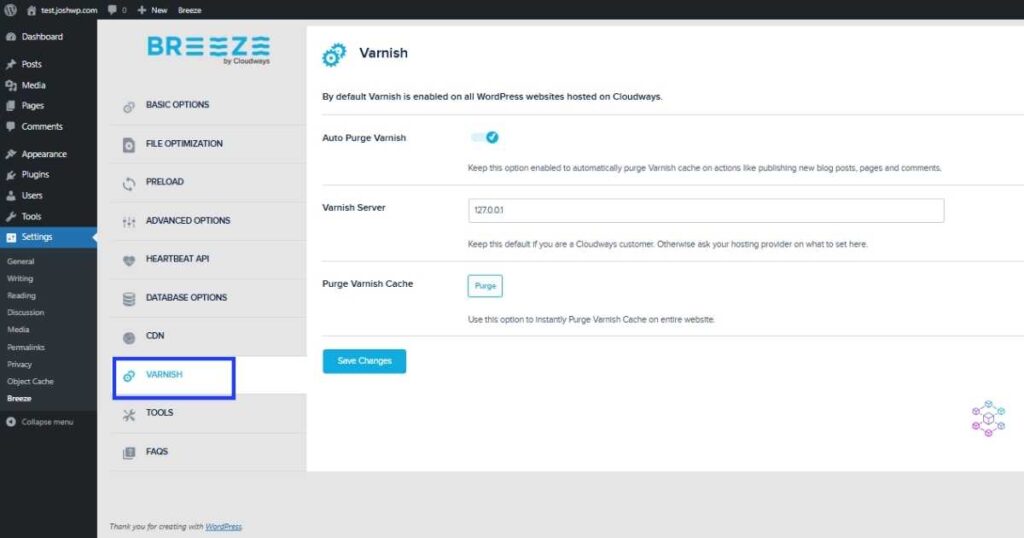
- The “Vanish” option gives you control over your website caching. This option is enabled by default, you can always purge your site’s cache when needed.
Domain and SSL Management
How to Point Your Domain to a Cloudways-Managed Server
To point your domain name to Cloudways;
- Copy your server IP address in the “Access Details section”
- Next, go to your domain register management dashboard and add new DNS records as shown below.
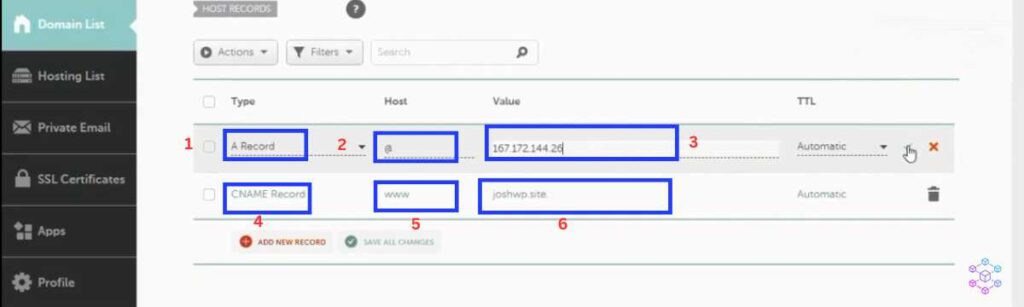
- The important records to be added include A records and CNAME records as shown above.
- Once you have added the records, give it time to propagate.
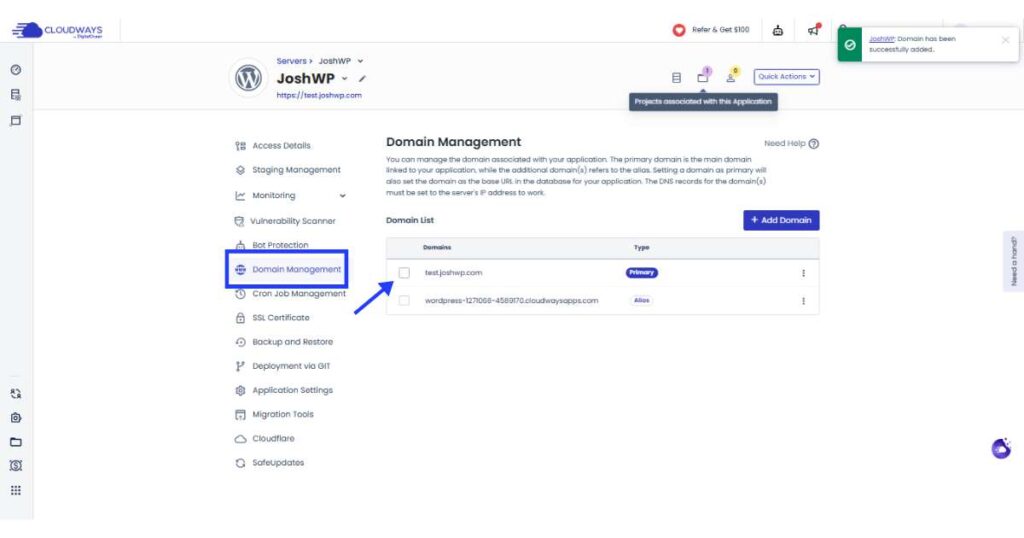
Now you can add your domain name to Cloudways as follows:
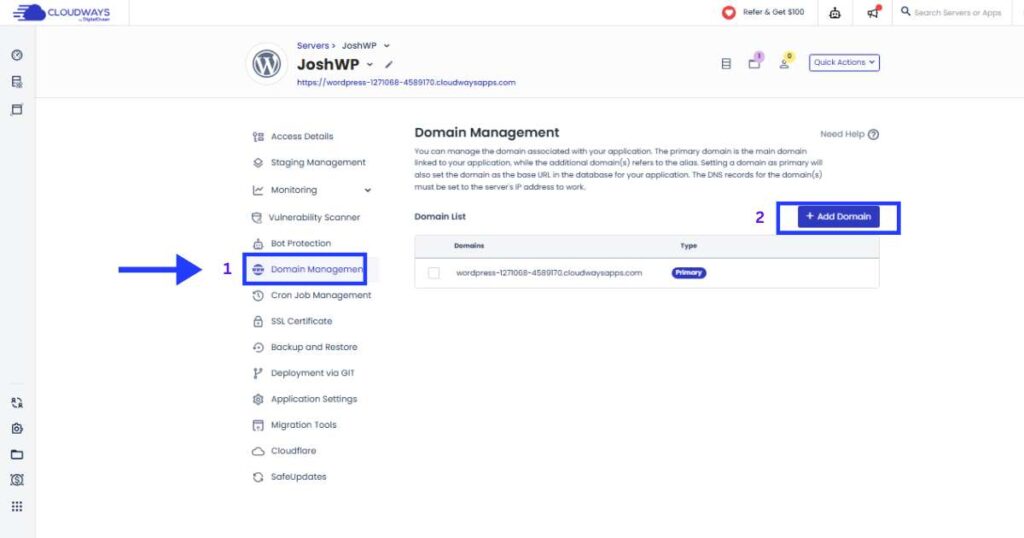
- Under the “Application Section” section, select the “Domain Management” option.
- Click on the “Add Domain” button to add your domain name.
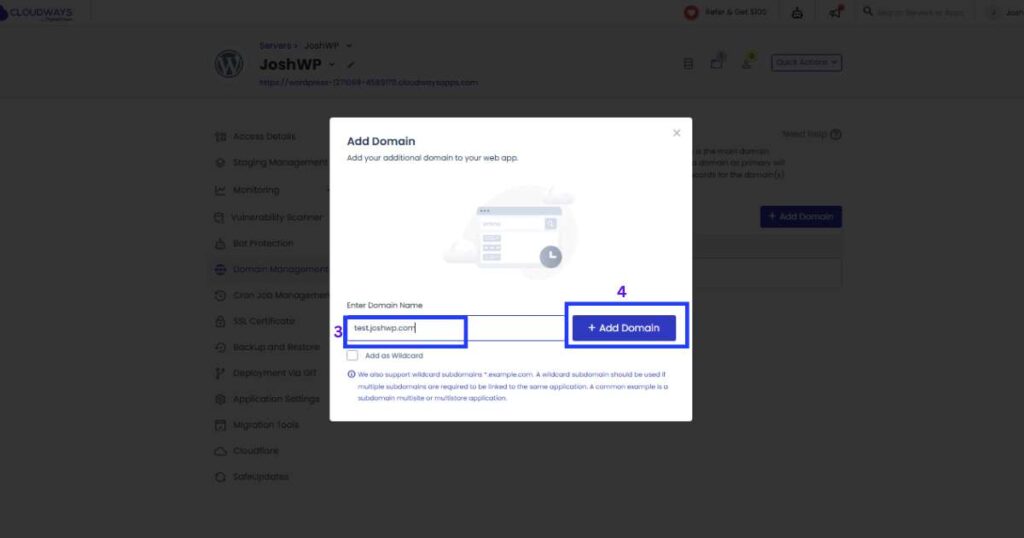
- A popup will appear where you will add your domain name in the format (yourdomain.com) without the https or any other characters. Once done, click on the ‘Add domain’ button.
- Change it to the primary domain by clicking on the 3 dots on the right of your screen > then click on the ‘make primary’ option.
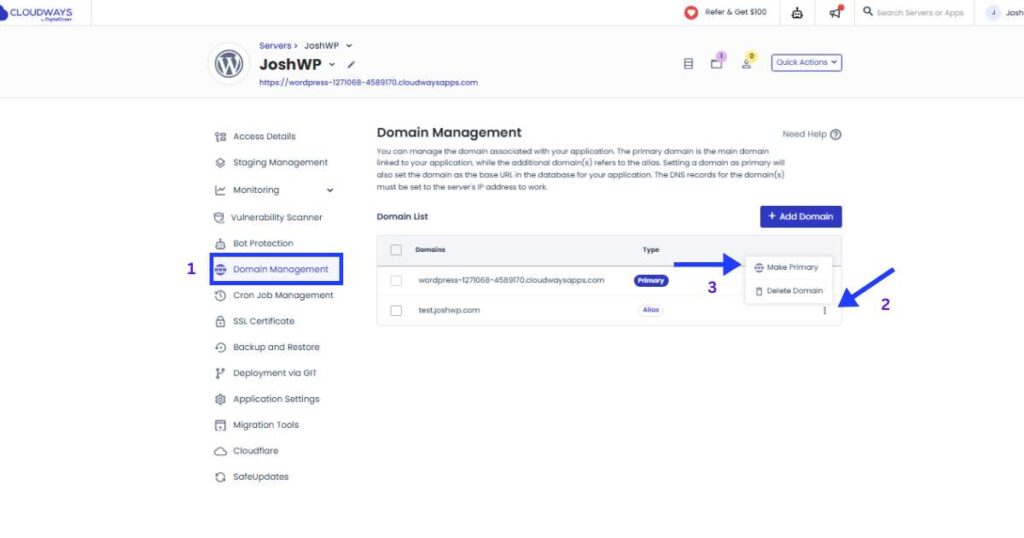
- A popup will appear asking you to confirm your action, click on ‘change’ to proceed.
How to add an SSL for Enhanced Website Security
Once you have added your domain name, consider adding an SSL certificate to your site.
- Under the “Applications” section, select the “SSL Certificate” option.
- Select Let’s Encrypt certificate
- Now, add your email address and domain name
- Then click on the “install certificate” button
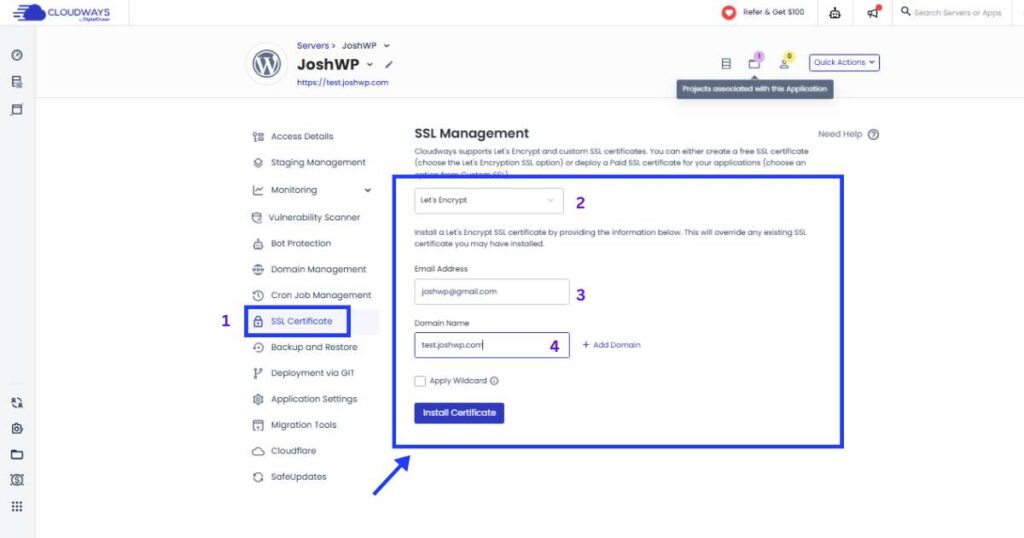
- Your SSL certificate is now successfully installed.
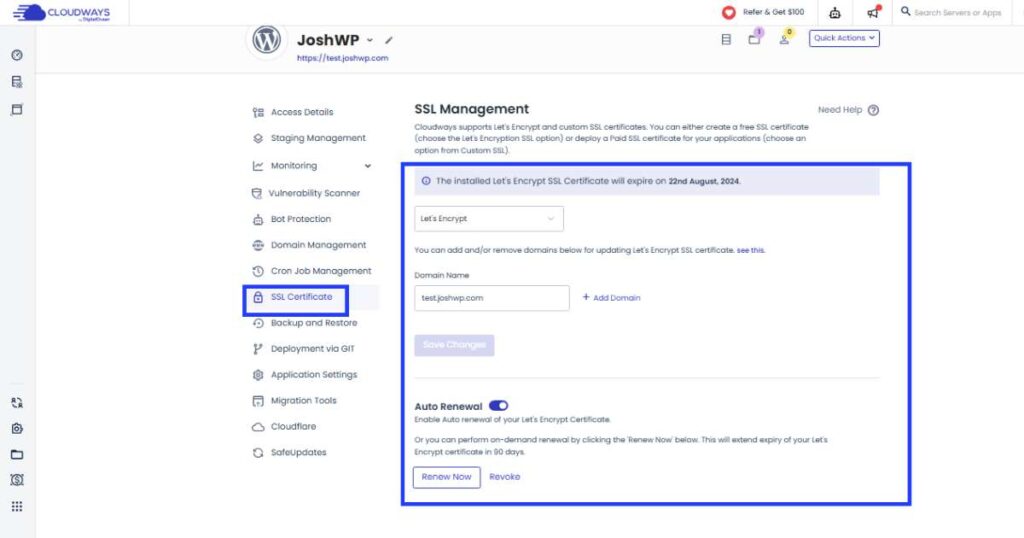
Now if you go back to the “Access details” section, you will see that your site’s information is updated, from a stagging domain name to your domain.
Related: how to set up WooCommerce on Cloudways.
Security and Backup Solutions
How to Configure Firewalls and Security Protocols
- Make sure Bot protection is enabled to prevent traffic from robots.
- You will find other helpful tools under the “Application Settings” section to reinforce your site’s security. This will be discussed under the advanced tools and integration section at the end of the page.
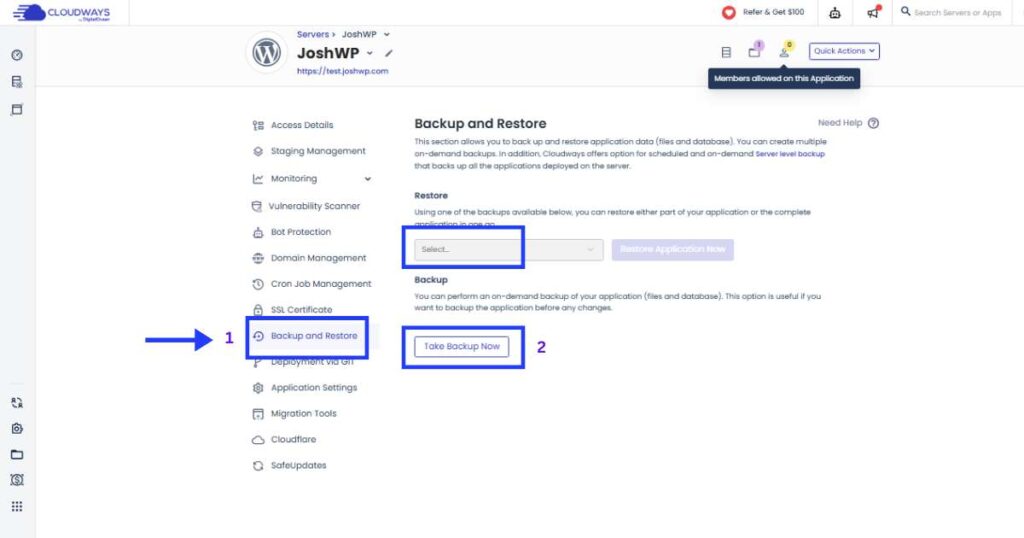
Cloudways Automated Backups
Under Applications, there is a tab named Backup and Restore. This allows you to take a backup of your application. You also have an option to create on-demand backups before making any changes to your website.
The “Restore” button gives you control of the backup version to restore to your application.
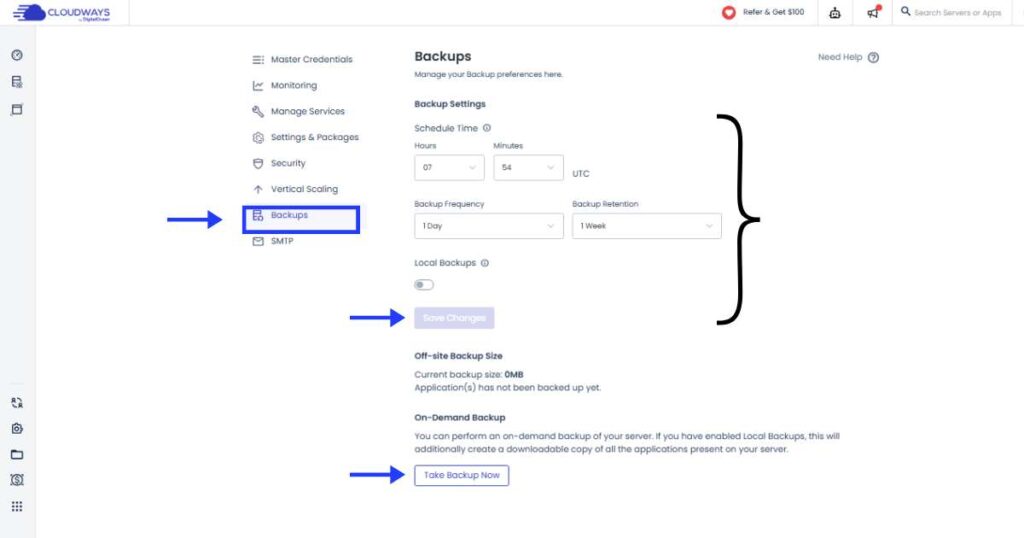
You can find more backup settings under the “Server Manager” which gives more control of the scheduling time, backup frequency, and the backup retention duration.
Content Delivery Network (CDN)
How to configure Cloudflare CDN on Cloudways
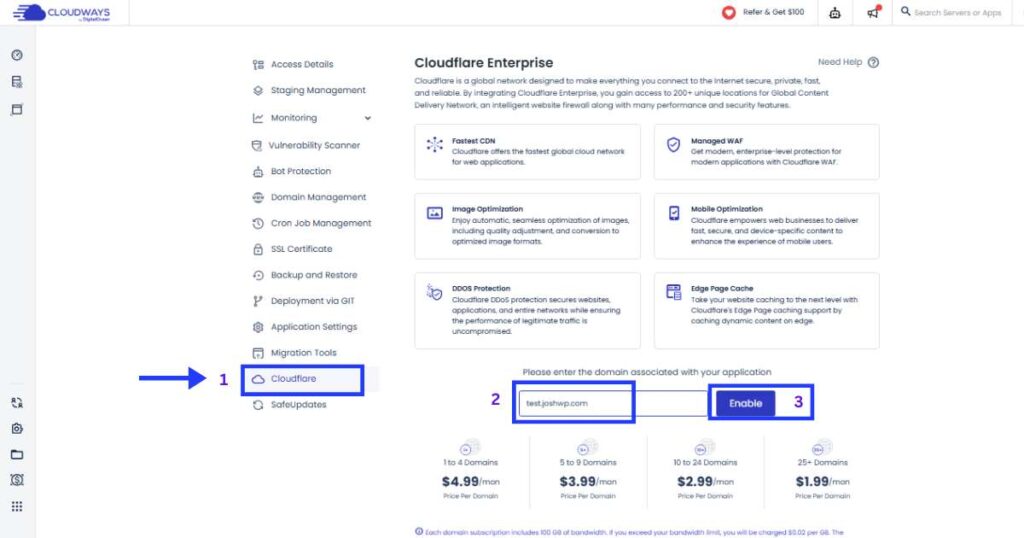
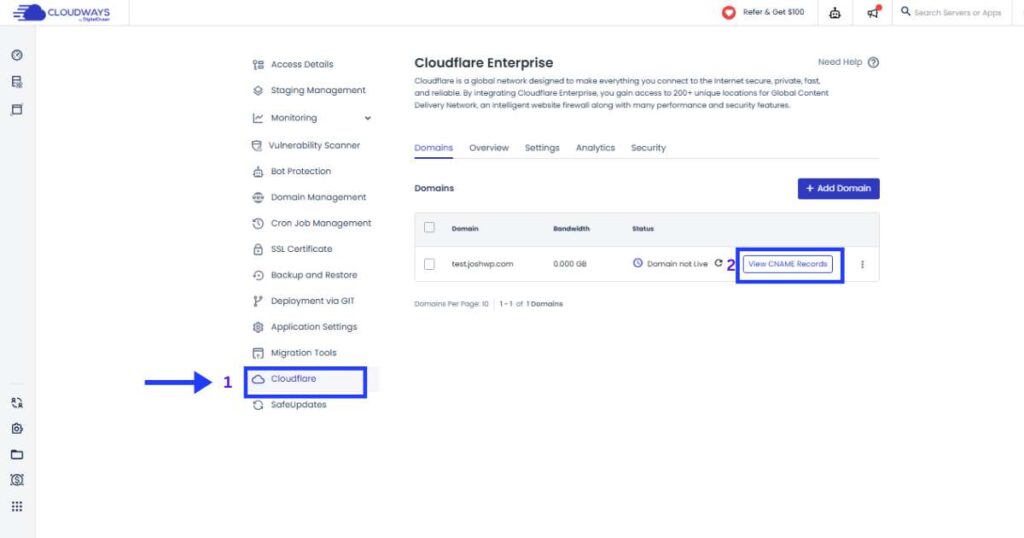
Again, on the ‘Applications Manager’, click on Cloudflare to configure your site to Cloudflare’s infrastructure. Cloudways offers you an affordable Cloudflare enterprise license beginning at $4.99/m. This comes with all the premium features of Cloudflare’s CDN.
To add your website to Cloudflare Enterprise;
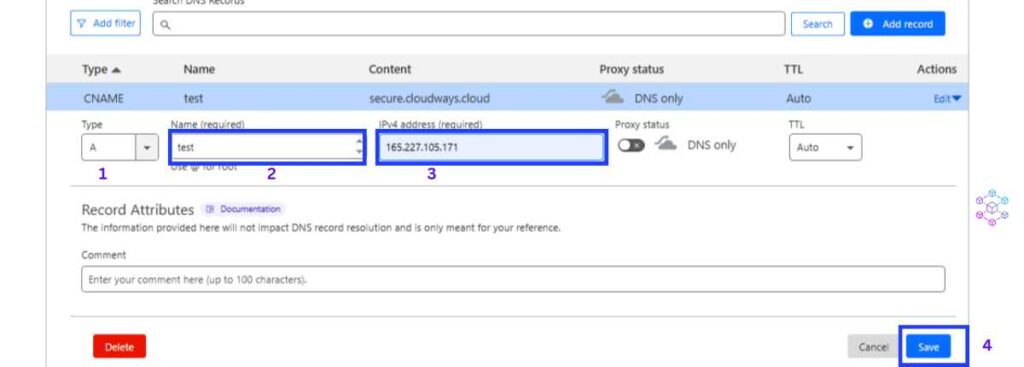
- Add your domain name in the section below, and then click on the Enable button.
- On the next screen select your domain name and click on the ‘VIEW CNAME RECORD’ button
- A popup will appear which prompts you to point your domain name to Cloudflare. You must have registered an account with Cloudflare before proceeding with this option. To do so, check out this article on how to add your domain to Cloudflare for free.
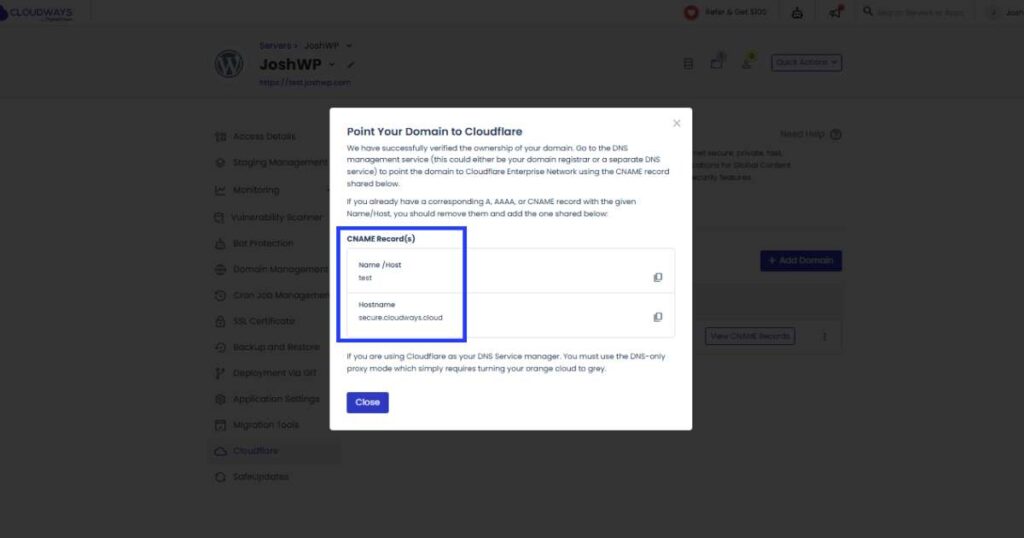
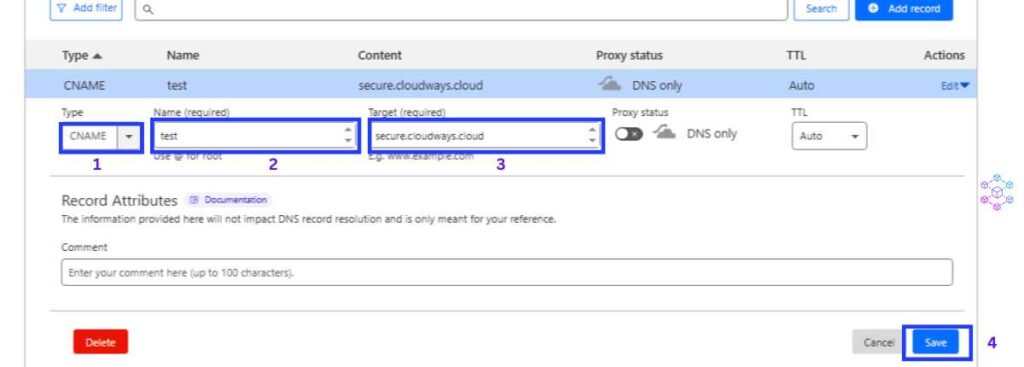
- If you have an active Cloudflare account, copy the CNAME record from the popup and add it to your Cloudflare’s DNS record as shown below.
Scaling and Resource Management
Dynamic Resource Scaling
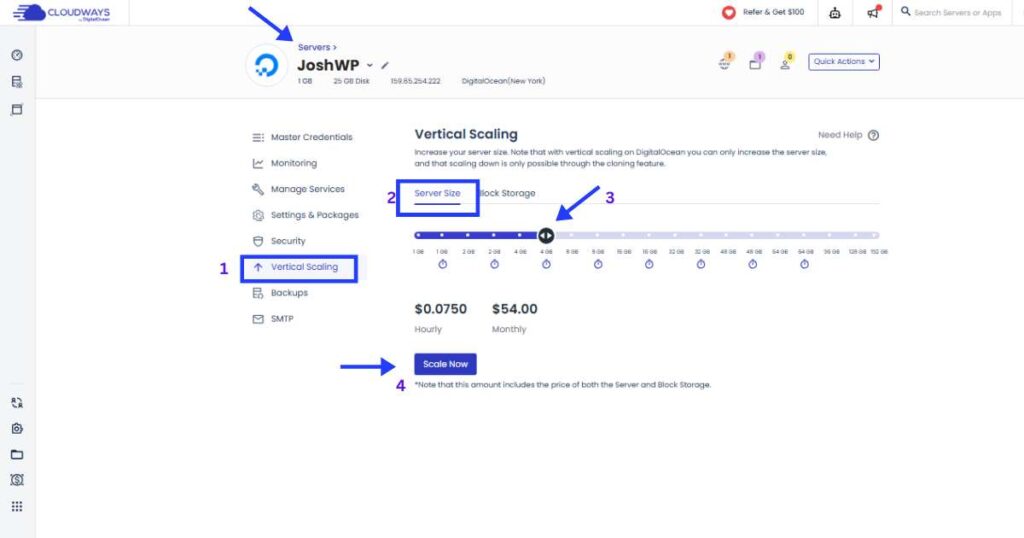
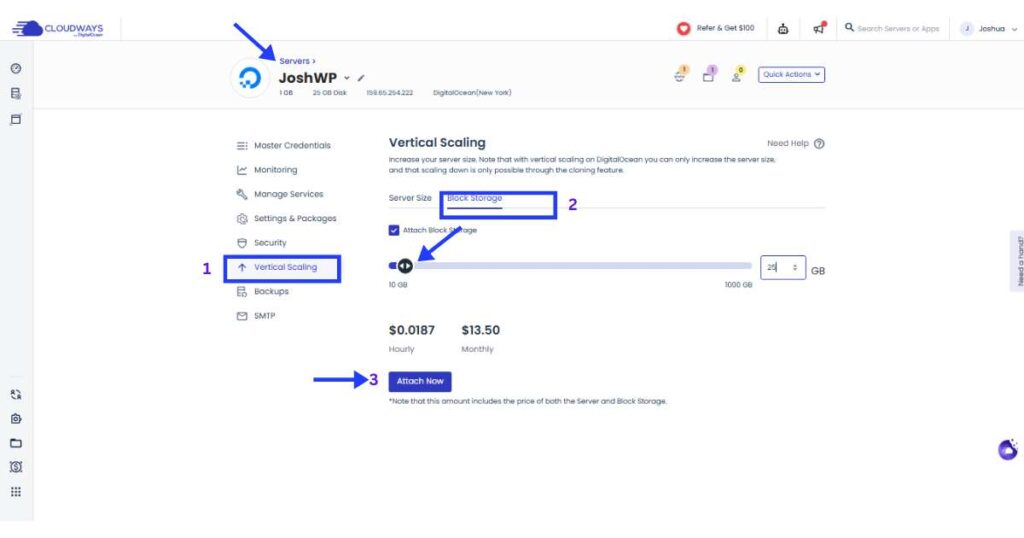
As your business grows you will end up needing more server resources. Cloudways has your back! Their vertical scaling option gives you the ability to scale your server without any difficulties. You also have the option to increase your block storage to cater to your business needs.
This is located under the Server Manager tab > Vertical scaling. Here you can increase your server resources including the RAM and the block storage as shown below.
Cloudways Database Management
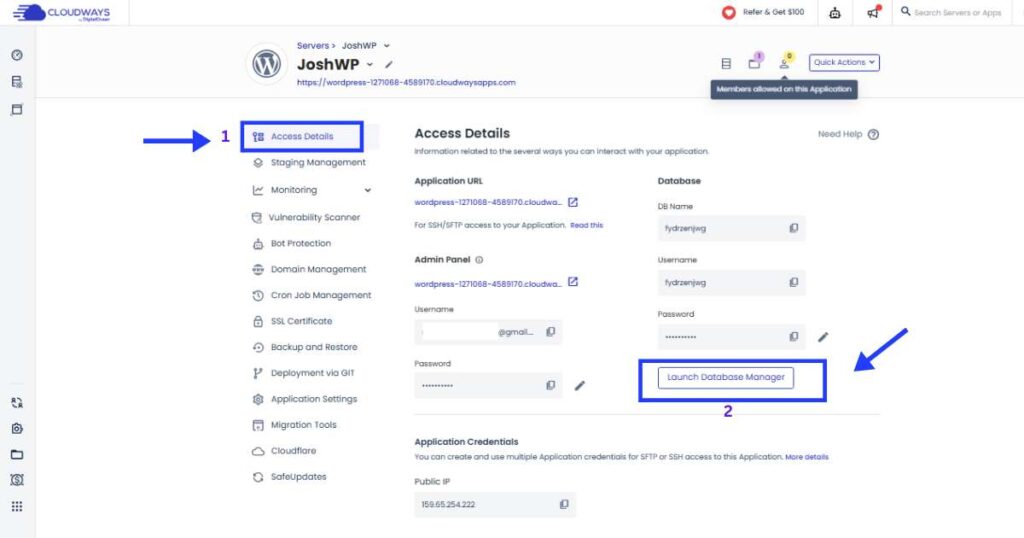
If you ever need to access and manage your website’s database, visit the “Applications Manager” tab, and select the “Access Details” option.
Under Database, you will locate a button named ‘LAUNCH DATABASE MANAGER.’ Click on it to access your database.
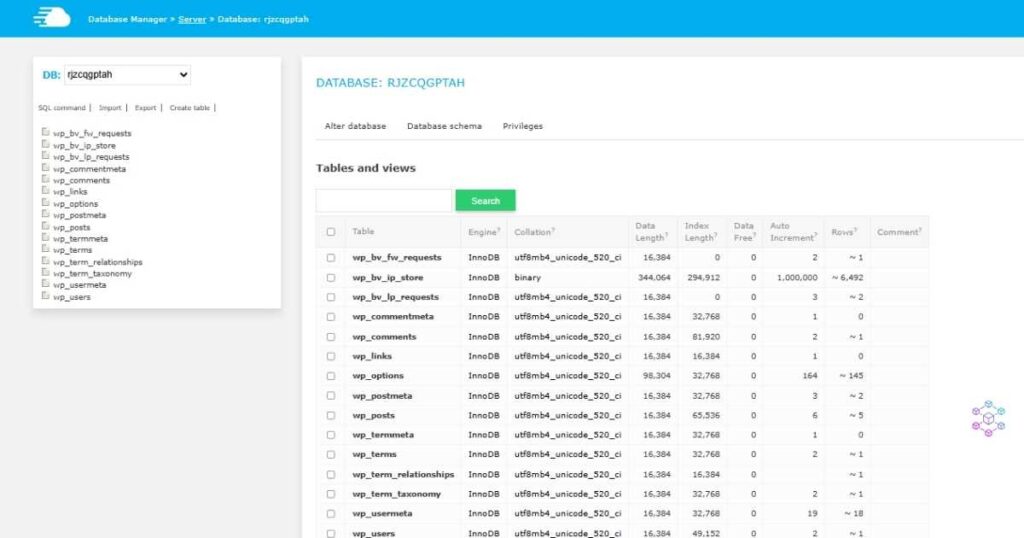
On the next screen, you can interact with your database and make any possible changes as needed.
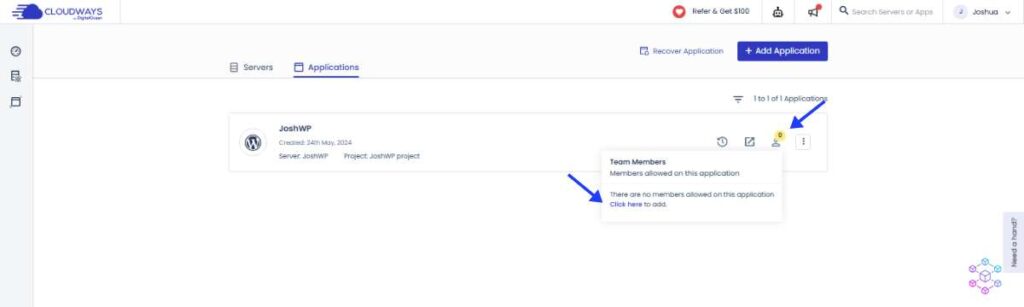
Team Collaboration Features
To help you manage your team and collaborate on projects, Cloudways offers a range of team features. Which includes managing team members and their roles on Cloudways, as well as collaborative tools for efficient project management.
To access this tool, click on the ‘Teams’ option on the main menu on the left of the page or Under ‘Applications’ as shown below.
- Click on the ‘Add new team member’ link as shown below
- You will be directed to a new page where you will be required to add new members to your team. Make sure to add the email, name, and role of each member.
- Also, choose which permission to grant them. Afterwards, click on the ‘ADD MEMBER’ button.
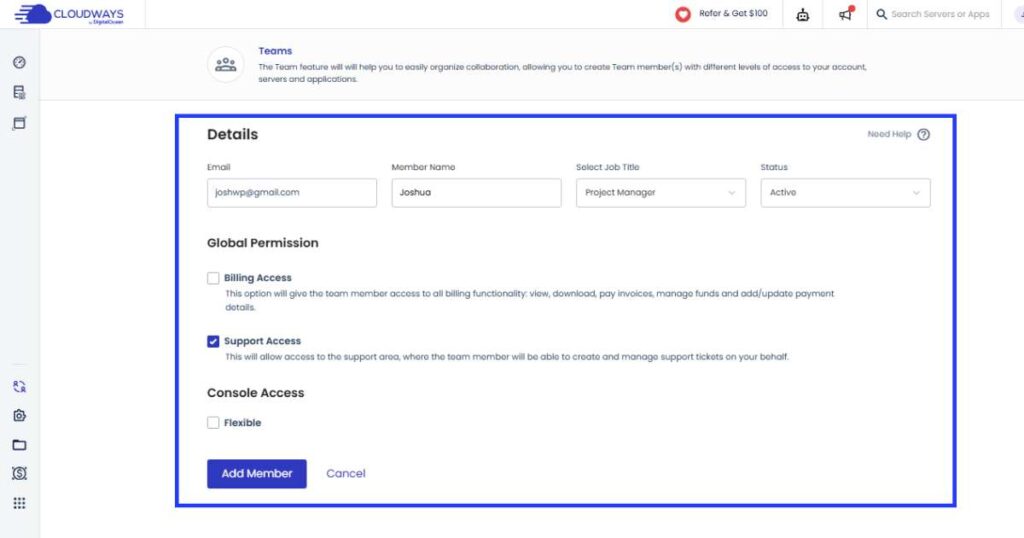
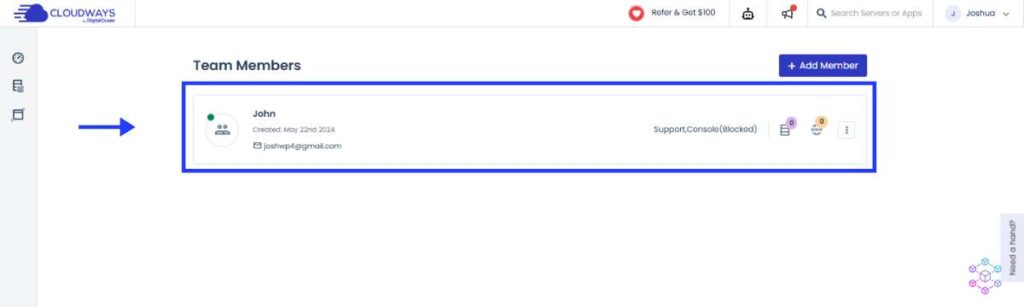
- In the example below I added John as a team member and gave him a project manager position, and support access as the permission option.
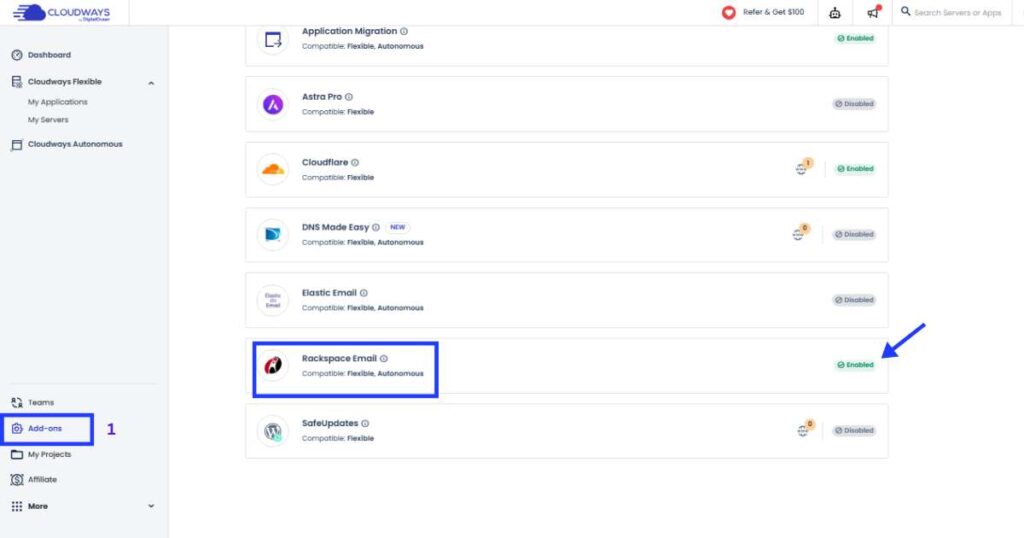
Available Email Solutions at Cloudways
Cloudways offers email support through other third-party applications which can easily be accessed on the ‘Add-ons’ section on the left of the screen as shown below.
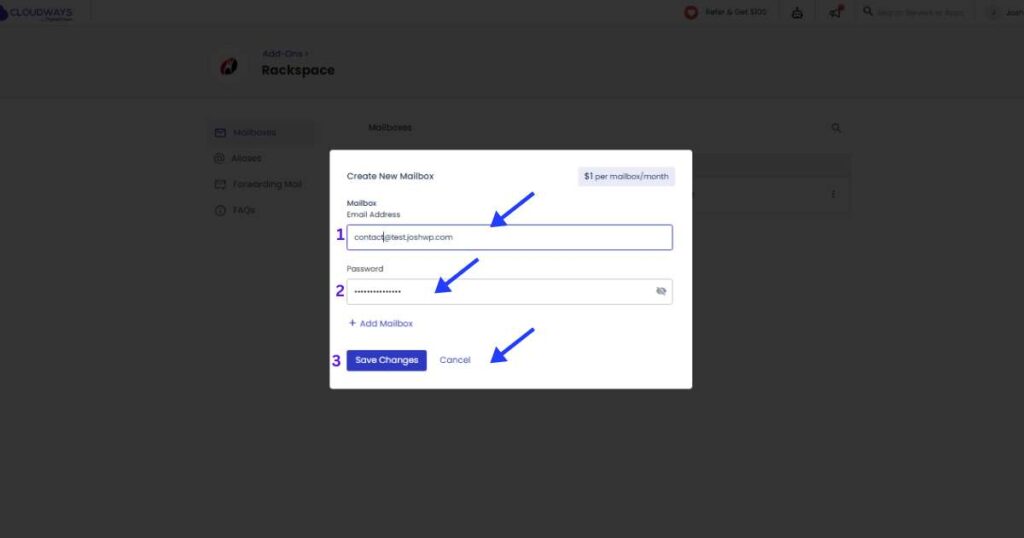
Now, select Rackspace Email and click on the pencil icon.
A popup will appear prompting you to create a new mailbox, by entering a custom business mail address in the format (x@yourdomain.com), and a strong password. Now click on the ‘Save Changes’ button.
The mailing service costs $1/m for every mailbox, which is a considerable cost for the majority of users.
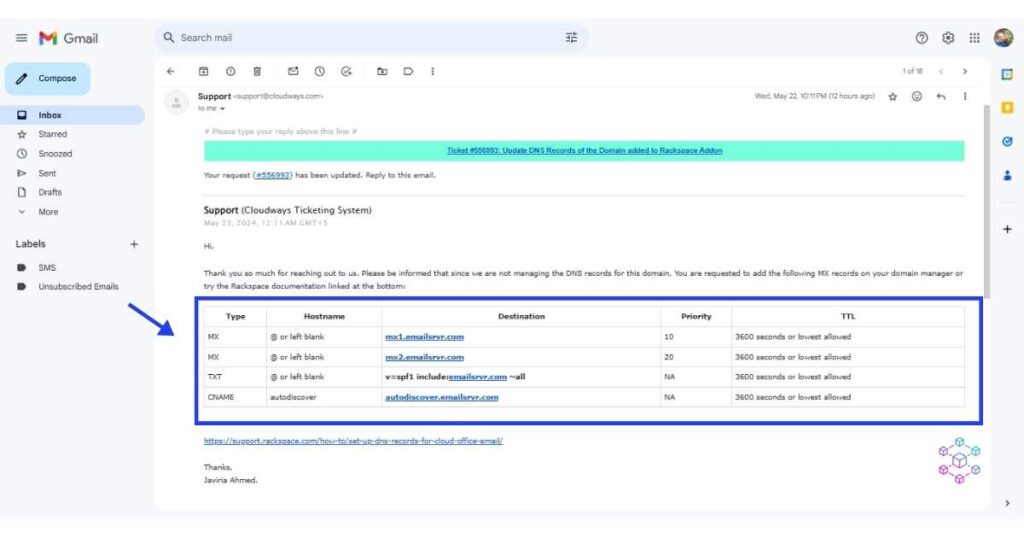
You will receive an email with a list of MX records to be added to your domain DNS manager. You can read this article on how to manage your DNS records.
For the complete email setup tutorial check out this article on how to use Rackspace Email Add-on.
24/7 Expert Support and Maintenance
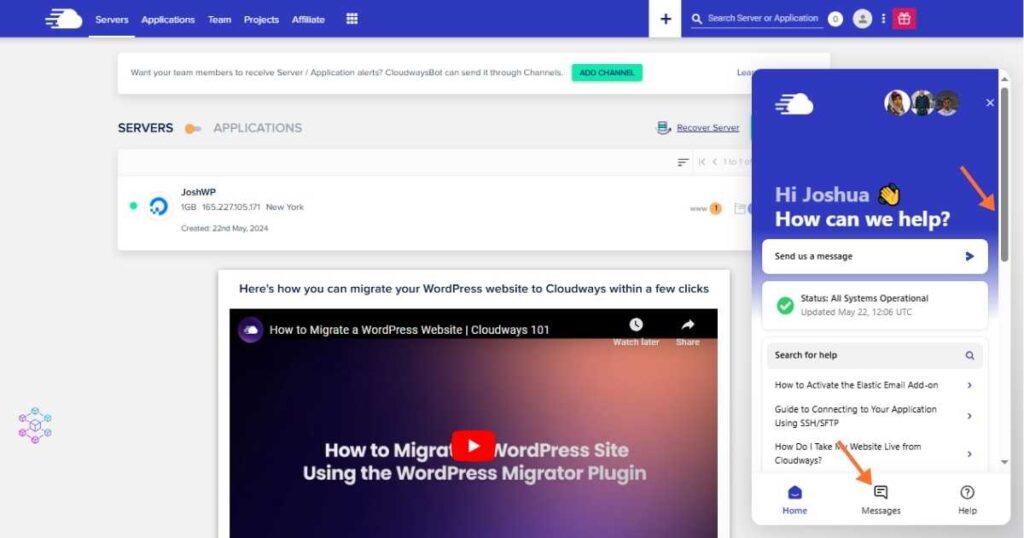
Cloudways offers 24/7 expert support and maintenance to ensure that your website is always running smoothly. You can easily reach out to customer support through the live chat support on your dashboard. The team responds within minutes hence saving you time.
Click on the ‘Need a hand’ floating button on the right hand of your screen to start a conversation.
For minor queries, you can access Cloudways’ comprehensive resource library for self-help.
Cloudways Billing and Account Management
To manage your Cloudways and DigitalOcean account settings;
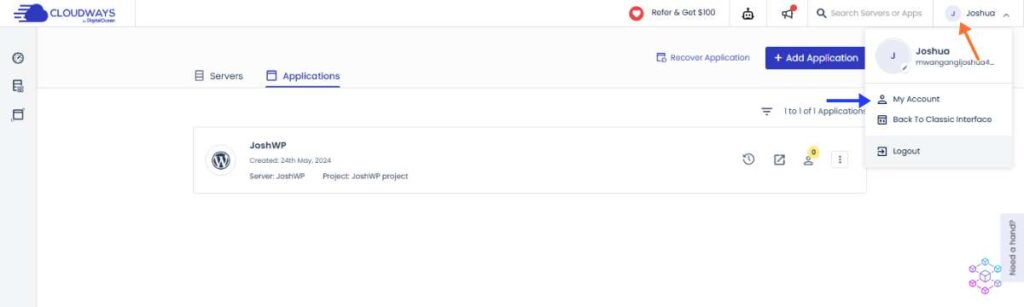
- Click on the avatar at the right-hand side of the header section. On the drop-down, select the ‘Account’ option
- You will be directed to an ‘Account’ Tab with different options. Select the ‘Payment & Address’ option to manage your payment details. Here you can update your payment details when needed.
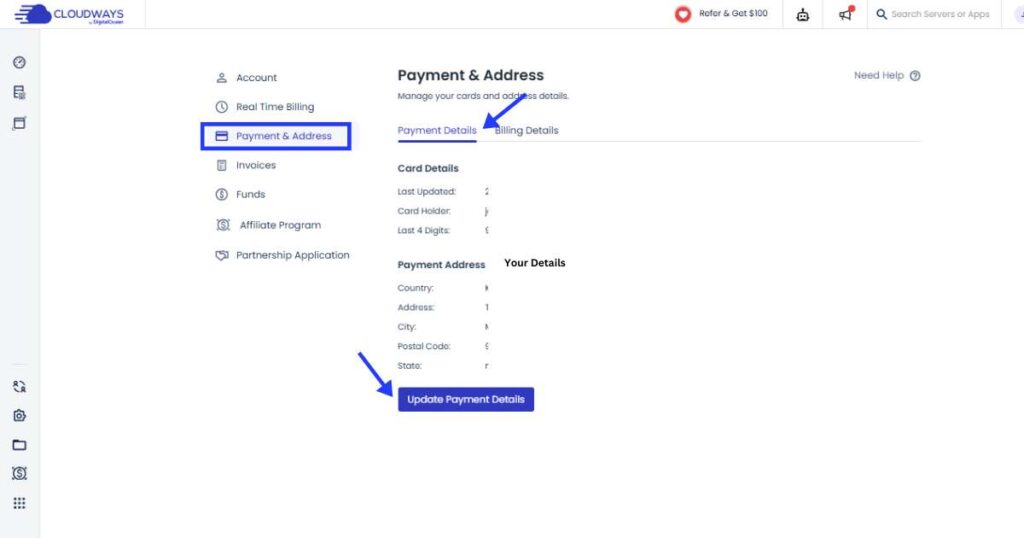
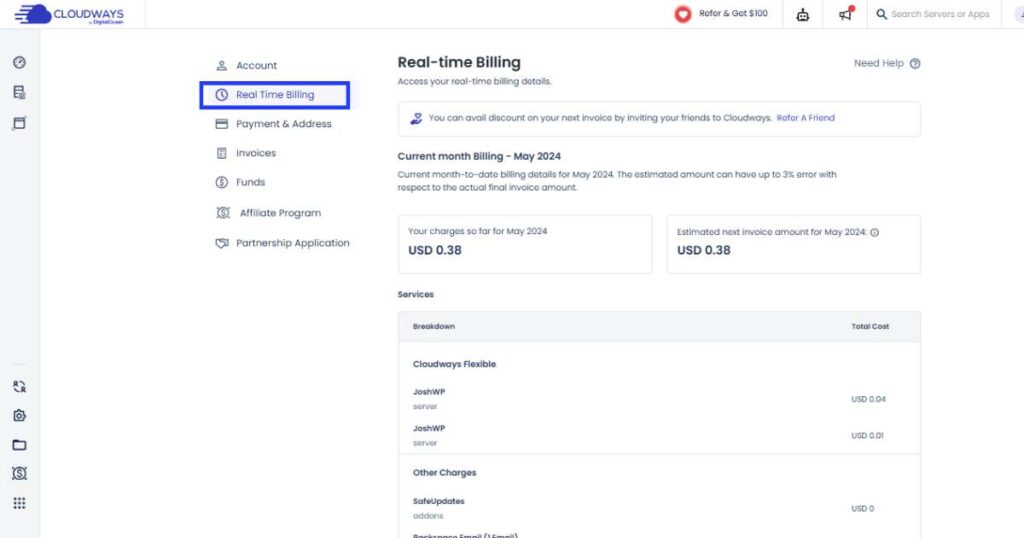
- To see your real-time usage, click on the ‘Real Time Billing’ option. Here you will see information on the total charge for the service thus far.
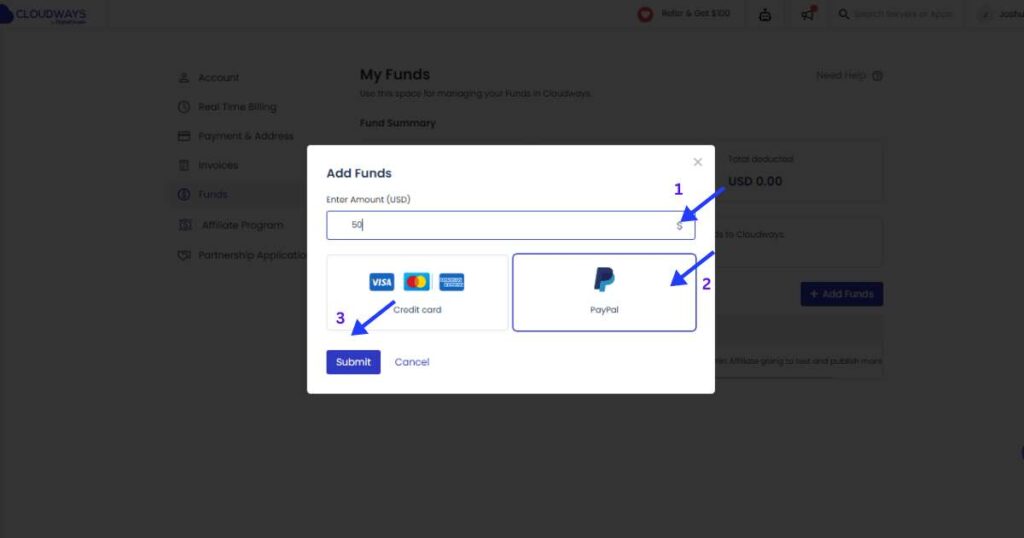
To avoid unnecessary issues, make sure to have enough credit on your serve and enough funds on the card used for billing.
To add funds to your account, click on the ‘Funds’ section. Now click on the ‘Add Funds’ button.

A pop-up screen will appear on which you can choose your preferred top-up method. Enter the amount you wish to add and then, click on the ‘Submit’ button and continue with the next prompt to complete the payment.
Performance Optimization Tools available on Cloudways
Cloudways come packed with performance features, which I am going to discuss in detail in this section.
How to Deploy Varnish for Advanced Caching Techniques
There are two ways to deploy vanish cache on your site.
- The first is the one we saw earlier using the Breeze plugin on the Website’s backend.
- The second option is located on the server side under the Applications Manager > Application settings.
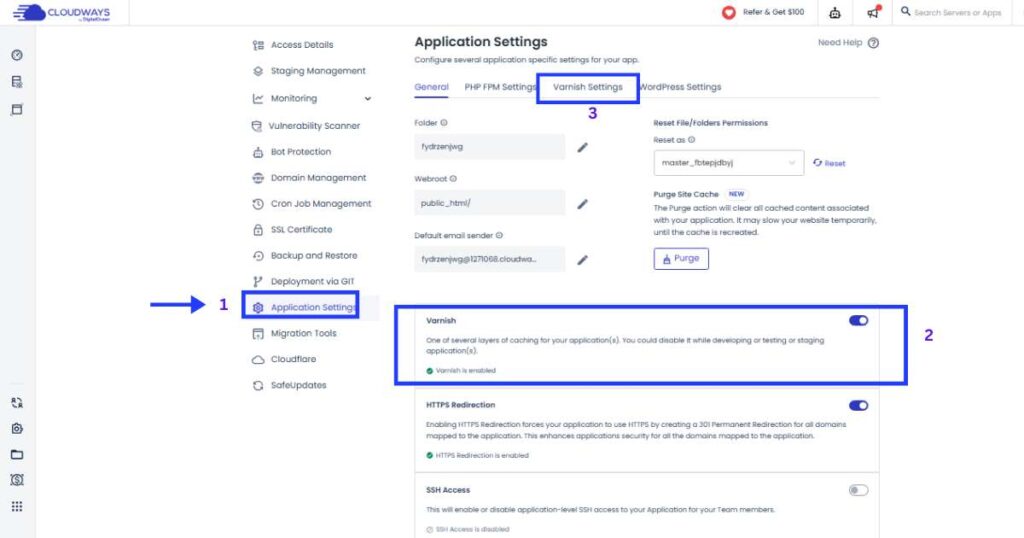
- Here you have the option to enable Vanish cache on the server side. You can add more configurations under the ‘Vanish Settings’ section.
- I have also discussed how to configure the varnish cache on the server level in the section below (Advanced tools and integration)
How to Leverage Redis and Memcached for Performance Optimization
The configuration of the Redis cache can be easily managed using the ‘Object Cache Pro plugin’ preinstalled in your WordPress site.
- Just visit your WordPress dashboard > Plugins > Object Cache Pro
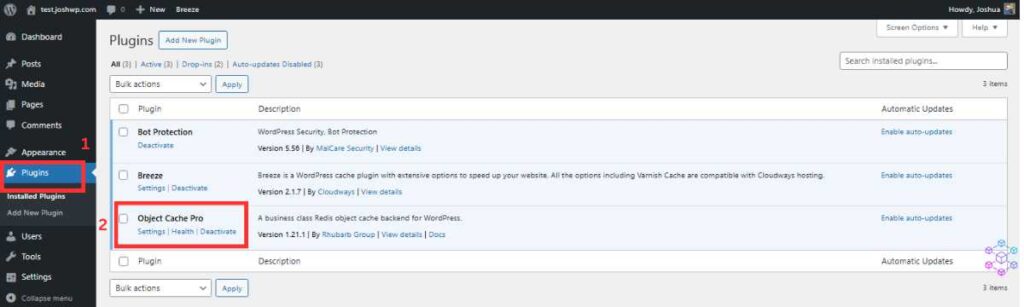
- Click on the ‘settings’ option to open the plugin’s settings. Redis Cache is already configured. Here you can see the requests made to the server, the memory usage, response time, and so forth.

I have shown you how to configure the Redis cache on the server level in the section below (Advanced tools and integration)
For those interested in the integration of Cloudways Autonomous for smart server management, read this detailed article on Cloudways Autonomous Review.
Cloudways Advanced Tools and Integration
How to Set Up and Managing Cron Jobs for Scheduled Tasks
In a nutshell, a cronjob is like having a reliable assistant who never forgets. It diligently performs tasks at scheduled intervals, whether it’s sending out daily reminders or tidying up files. The term “Cron” itself has a touch of mystery. On Unix-based systems like Linux and macOS, it orchestrates these recurring tasks seamlessly, much like a conductor leading a symphony.
Now that you have an idea of what the Cron Job Manager does, let’s see how we can access and configure it on Cloudways’ dashboard.
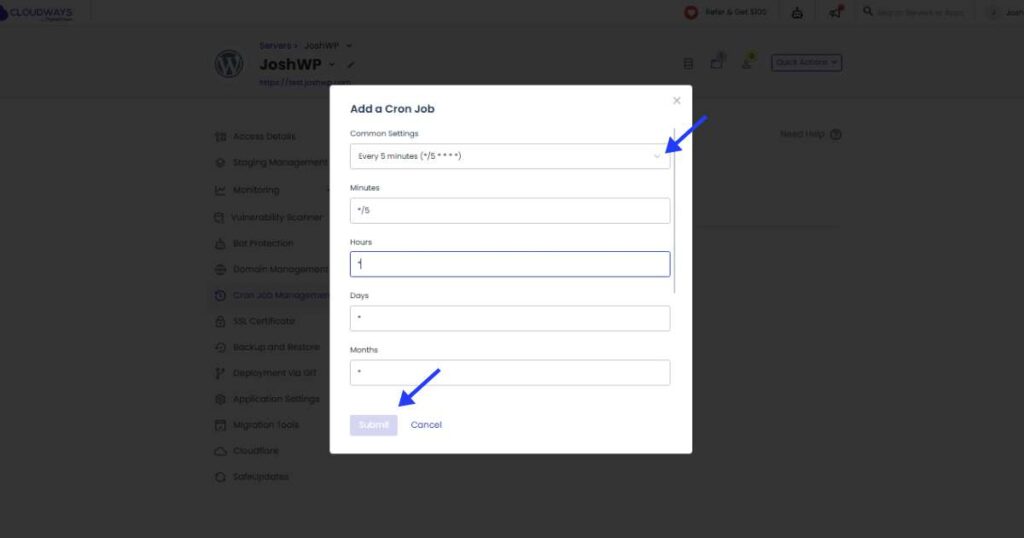
- Under “Application Manager” click on the Cron Job Management option.
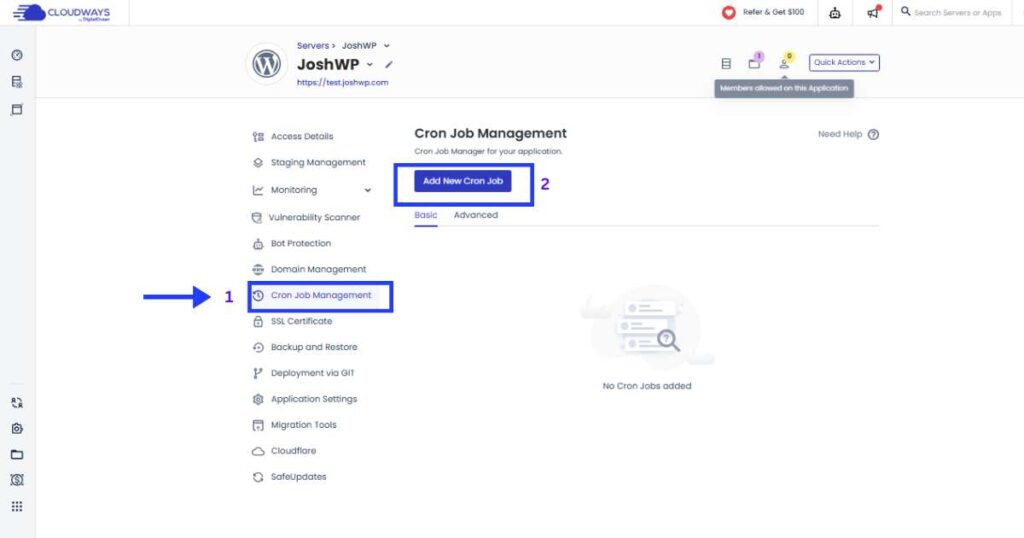
- Now click on the “ADD NEW CRON JON” button and add your rules.
Staging Management
Cloudways stagging offers you an isolated environment to test new themes, plugins, and code without breaking your live site.
To access the staging tool, click on the Staging Management option under the Application Manager tab. Now you can launch a staging site by clicking on the ‘LAUNCH STAGING APPLICATION’ button.

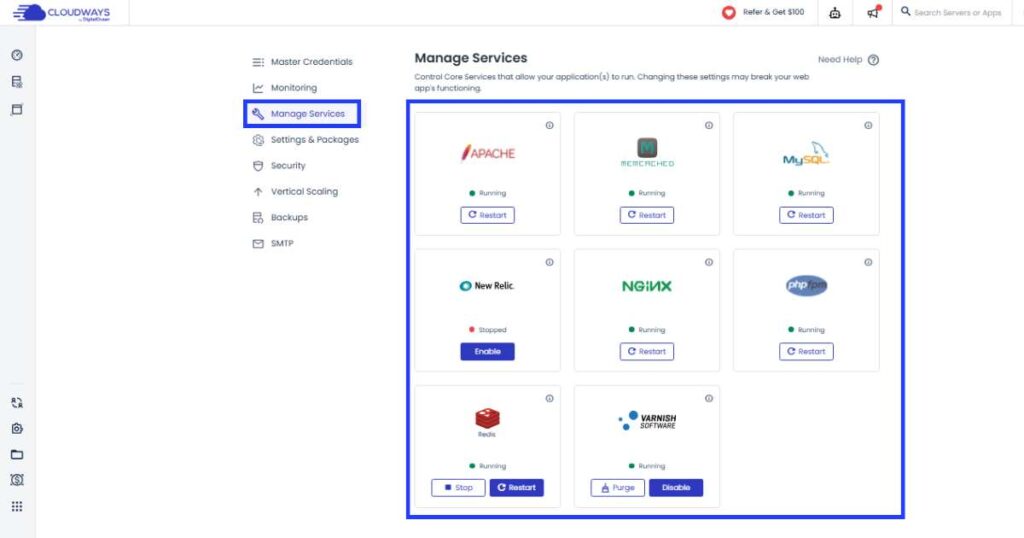
Manage Service Tool
Cloudways gives you access to the core services that allow your site to run smoothly. Take caution as the wrong configuration may break your website’s functionalities. These services include Apache, Memcached, MYSQL, Nginx, Redis, Vanish, and PHP FPM.
Here you can enable or disable a service.
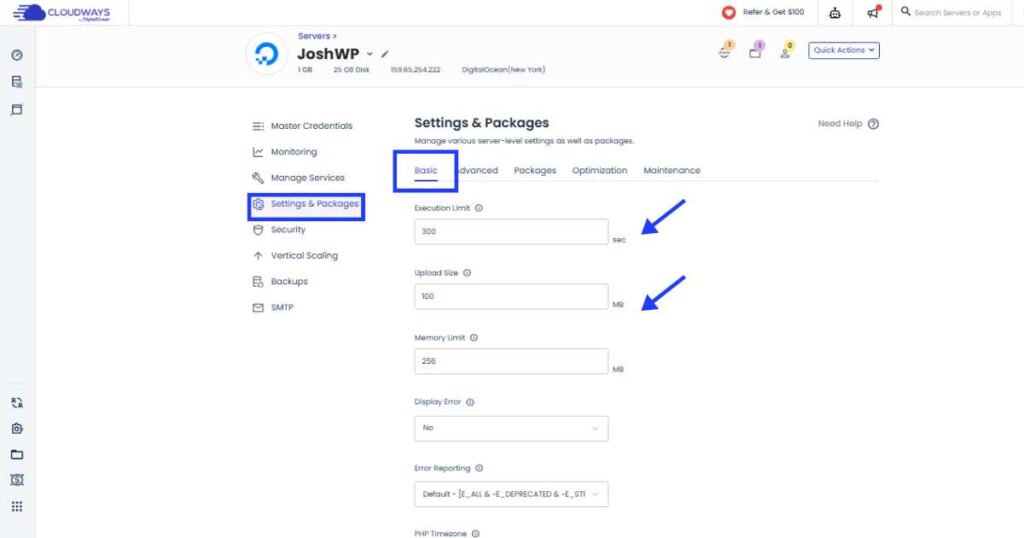
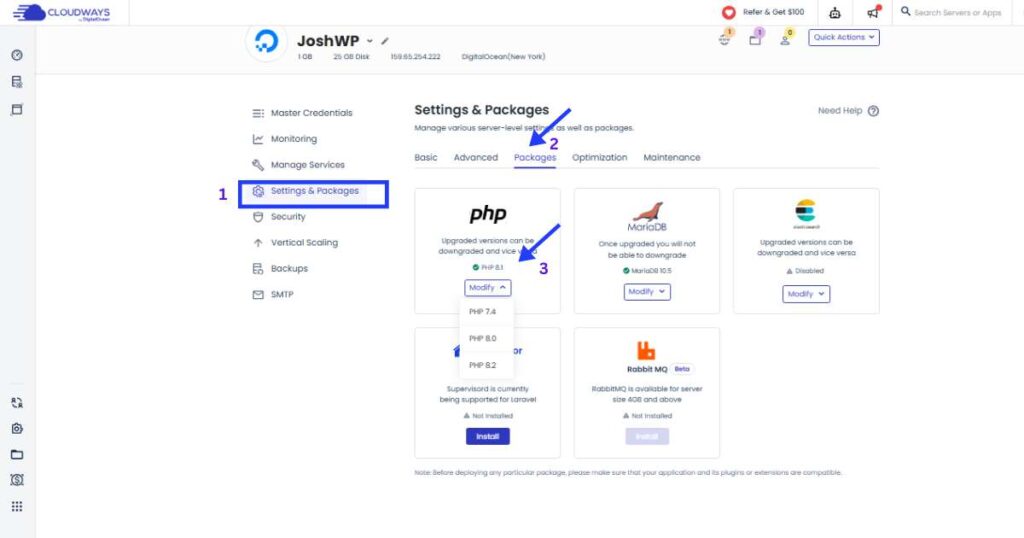
Server Package Settings
This tool gives you the liberty to manage various server-level settings and packages. The tool is found under the Server Manager tab > Settings & Packages.
On the ‘BASIC’ option, you can change the upload size and the memory limit of your site.
On the ‘PACKAGES’ section, you can upgrade or downgrade your PHP version.
And on the ‘MAINTAINANCE’ section, you can schedule server maintenance when needed.
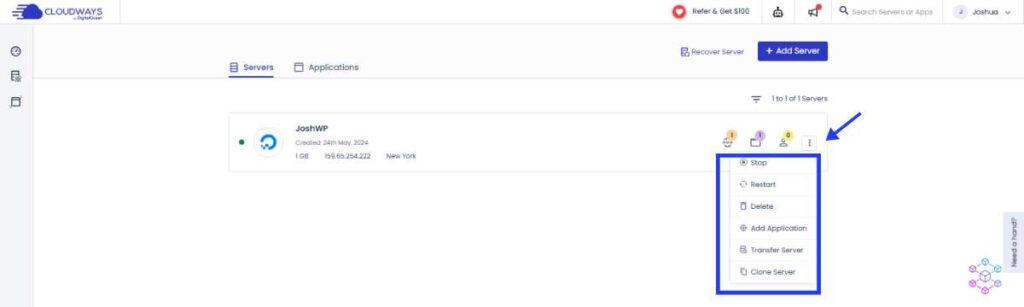
Lastly, to clone your server, restart, or delete it, click the three dots on the right under the ‘Servers’ menu button as shown below.
Conclusion
Just to recap on the benefits of using DigitalOcean on Cloudways, below is a summary of these benefits
Advantages of managed cloud hosting on Cloudways:
- Scalability: Cloudways allow for easy scalability, accommodating changing traffic demands without downtime.
- Security: Robust security measures, including automatic backups and firewalls, protect your website and data.
- Performance Optimization: Tools like caching and content delivery networks ensure efficient website loading.
- 24/7 Support: Dedicated support and a comprehensive knowledge base are available.
- Cost-Effectiveness: Pay-as-you-go pricing suits businesses with fluctuating traffic.
- Flexibility: Supports various applications and platforms.
- Easy Management: A User-friendly interface simplifies server management.
- eCommerce Integration: Seamlessly integrates with popular eCommerce platforms.
- Free Trials: Offers a 3-day free trial.
- Robust Infrastructure: Leverages DigitalOcean for reliable hosting.
Advantages of choosing DigitalOcean on Cloudways for your website deployment:
- Scalability: DigitalOcean’s cloud infrastructure allows flexible resource scaling, ensuring responsiveness and efficiency.
- Security: Robust measures protect your website and customer data, including backups and firewalls.
- Cost-Effectiveness: Pay-as-you-go pricing suits businesses with fluctuating traffic.
- Performance Optimization: Optimized infrastructure ensures quick loading even under heavy traffic.
- Easy Management: Cloudways’ user-friendly interface simplifies server management.
- eCommerce Integration: Seamlessly integrates with popular eCommerce platforms.
- Robust Infrastructure: Leverages DigitalOcean for reliability and high performance.
- Advanced Tools: Offers custom automation and Cron Job management.
Having seen what Cloudways’ infrastructure is capable of and the availability of advanced tools, I highly recommend deployment on DigitalOcean via Cloudways to anyone, be it a new WordPress user, a pro user, or a business looking to host their application on a fully managed cloud hosting solution. Cloudways is the best choice.
Disclosure: We may earn commission for purchases that are made by visitors on this site at no additional cost on your end. All information is for educational purposes and is not intended for financial advice. Read our affiliate disclosure.