How to add Ads using WpCode Snippets plugin
Are you looking for a way to display ads on your site using a plugin? In this article, I will show you how to add Ads using WpCode snippets plugin.
The WpCode snippets plugin comes with numerous features that make it super easy to manage codes in your WordPress website. This helps to reduce the number of plugins on your site improving your site’s speeds.
You can use the plugin to add as many Ads units as possible on different locations on your site.
Related: How to fix Ads display issues using WpCode snippets
How to insert Ads using WpCode snippets plugin
1). Add a new snippet
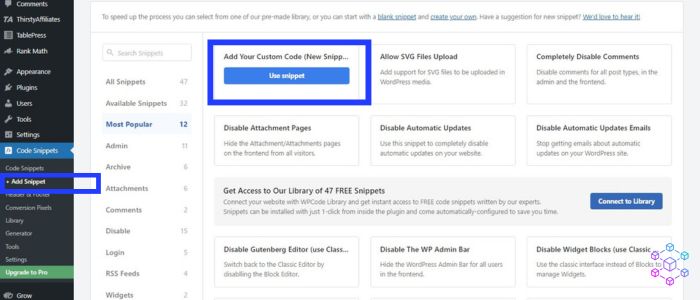
Once you have installed the plugin, navigate to your WordPress dashboard menu, under ‘Code Snippets’, click ‘Add Snippet’, then choose the first option to ‘Add your custom code’.
2). Add your ads script

On the next tab, you will need to add your ads code, give it a title, and make sure to choose the code type; either HTML for ads, or JavaScript and CSS for others.
3). Choose the insertion method
There are two options to choose from; auto insert or the use of a short code. If you choose the auto-insert method, the code will automatically be executed site wide on the specific location you have chosen. This is the best way to display ads on your blog pages.
4). Choose Ads location on your website
Next, you will need to choose a location on your web pages where the code will be added. If you want it to be displayed on the header of every page, then go to Global > Site Wide Header.
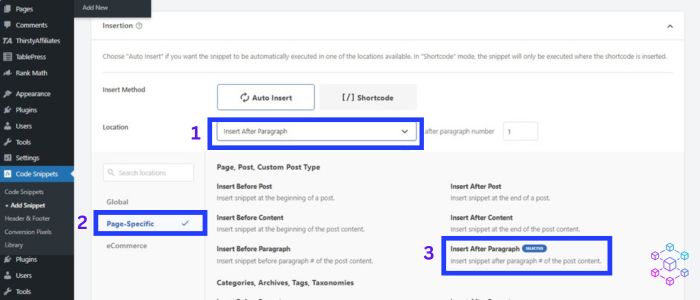
To display ads in specific locations on your blog posts e.g. after a paragraph, go to Page-Specific > Insert After Paragraph. Then chose which paragraph number you want to display after.
5). Choose the device type
If you are interested in displaying your ads on all devices, which is recommended, then select the first option.
6). Enable smart conditional logic
The smart conditional logic aids in limiting where you want your ads snippets to be auto-inserted.
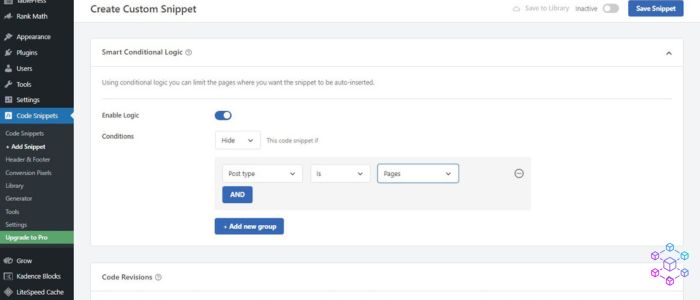
For example, if you only want to display your ads on blog pages, then, on the ‘conditions setting‘ choose hide, and click on the ‘Add new group button’.
On the first box click to change to ‘Post Type’ and on the third box click to change to ‘Pages’.
7). Priority setting
Here you can change the priority of code snippets to determine when they will be executed. For the first two ad codes, you can set the priority to 5, and leave the rest as default. This way the first ads will be displayed earlier when the page is loading.
8). Add Tags
This will help you to group similar codes for easy management. This may not be necessary if you don’t have many codes.
9). Activate and save the code
Once you are done with all the above steps, don’t forget to activate the code and save it. The ‘Activate’ button is at the top of the page next to the ‘Save button’.
10). Test your website
You can now test to see whether the ads are displaying correctly in each location. If you encounter any issues, you can read this article on how you can fix common Ads display issues on the WpCode Snippets plugin.
Disclosure: We may earn commission for purchases that are made by visitors on this site at no additional cost on your end. All information is for educational purposes and is not intended for financial advice. Read our affiliate disclosure.