How to insert AdSterra Ads using a plugin

Are you looking for a way to add AdSterra Ads using a plugin? Look no further, I will explain step by step How to insert AdSterra ads using a plugin.
There are many free plugins on the WordPress repository that can help you display Ads on your website. My favorite of all is WpCode Snippets as it not only helps with Ads display but can also be used for inserting any script on your website for different purposes such as disabling comments site-wide and much more. This helps reduce the number of plugins on your site, consequently improving its speed.
How to add AdSterra Ads using a WpCode snippets plugin
Install WpCode Snippets plugin
To insert AdSterra Ads on your blog posts, go to plugins > Add new > then search for WpCode Snippets and activate the plugin. Once done, follow these steps to add your AdSterra Ads code.
Add a new snippet
On your dashboard menu navigate to Code Snippets> Add New > and choose the ‘Add a custom code’ option. Now add your Ads script, name it, and chose the code type. (For Ads display it will be HTML).
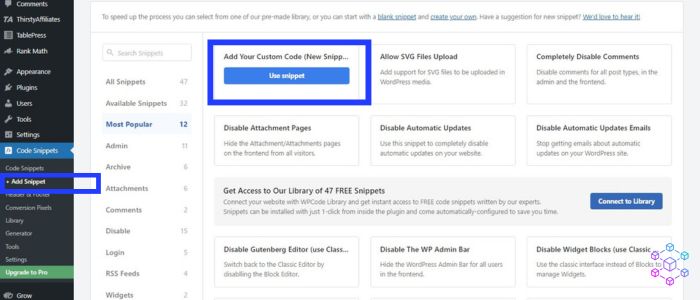
You can add the same Ad unit on as many locations on a blog post as possible to increase Ads’ impression. This can be helpful if you have low web traffic and you want to maximize your profits. However, don’t overdo it to maintain the quality of Ad impressions.
Related: How to fix Ads display issues using WpCode snippets
Choose Ads location on your site
Now choose where you want your Ads to display on your site. Either on a page or the blog posts. For blog posts, go to Page-Specific > Insert After Paragraph if you want to insert the code in between the paragraphs, and choose the ‘Paragraph Number’ where the Ad will be displayed.
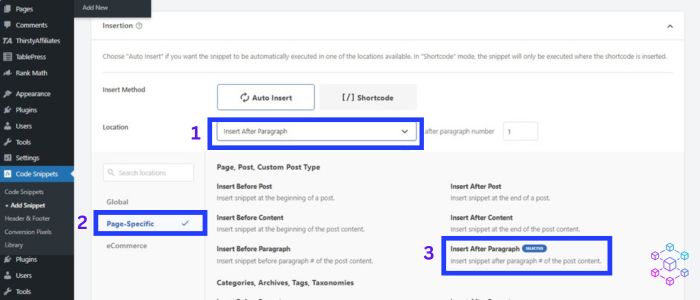
Also, you have the option to either auto-insert or use a shortcode to display your ads codes in different locations. I recommend the auto insert for Ads displayed on blog posts.
Enable smart conditional logic
The smart conditional logic setting helps you determine how you want the Ads to display especially when using the auto-insert option.
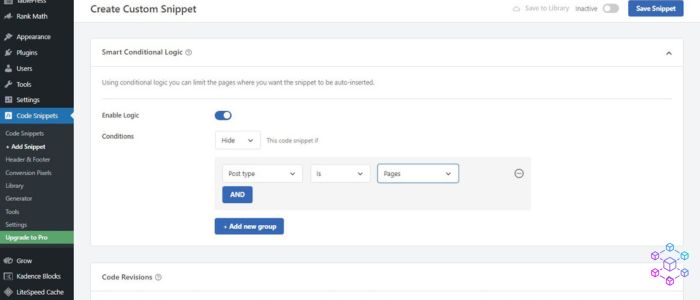
For example, if you only want the Ads to show on blog posts, then, click on the ‘Hide’ option. On the first box chose ‘Post Type’ and on the third box chose ‘Pages’.
Priority setting
This setting helps to determine when a code will be executed when the page is loaded. I recommend choosing a priority of 5 for the first two Ads and for the rest you can leave it as default.
Activate and save code
Don’t forget to activate the code and save it. You can now test your website to see how the Ads are displayed.
Disclosure: We may earn commission for purchases that are made by visitors on this site at no additional cost on your end. All information is for educational purposes and is not intended for financial advice. Read our affiliate disclosure.


